Insimenator.org
April 19, 2024, 08:21:37 pm *
Welcome, Guest. Please login or register.

Login with username, password and session length
News:
 
  Home Forum Help Search Calendar Login Register  
  Show Topics
Pages: 1 2 3 [4]
46  Simmers' Paradise / General Sims 2 Discussion / Sims 2 Pets Unlockable Codes on: October 18, 2006, 05:27:46 pm
How to unlock the codes:
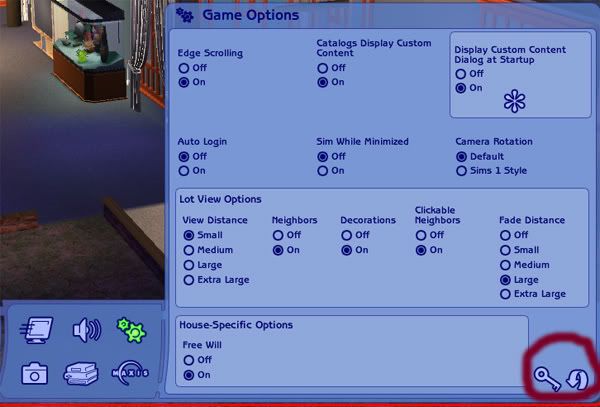
You can either go in through options/Game Options/Click the key icon in the lower right hand corner or you can...
 
2. Enter a Neighborhood, click the FAMILIES button, then click
CREATE NEW FAMILY.
3. Click the Options icon (the "...") and then click the Game Options
icon (the cogs).
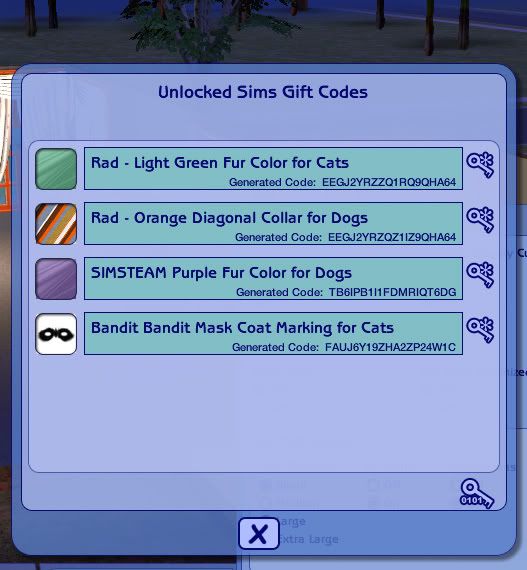
4. Click the Blue Key icon which opens the Unlocked Sims Gift Code
dialog box.
5. Click the Enter a Code Key icon, enter the code above, and click
the Check Mark icon. If your code is valid, the Bandit Cat will
appear in the Breed Bin.
6. Click the CREATE FAMILY button, click the CREATE A SIM button,
then click the CREATE A CAT button.
7. Click the CHOOSE A BREED (#2) button and you'll find the Bandit
Cat.


Cats:
Fur Patterns:
Bandit Mask: EEGJ2YRQZZAIZ9QHA64
Panda Coat Markings: EEGJ2YRQZQAIZ9QHA64
Star Coat Markings: ZZZ11ZZZ9ZAAQ91ZB1A, EEGJ2YRZQZARQ9QHA64
 
Collars:
Black Dot: ZZZ11ZZZ9Q11Q91ZB1A
Black Smiley: EEGJ2YRQQZ1RQ9QHA64, ZZZ11ZZQ9Z1AQ91ZB1A
Blue Bones: EEGJ2YRQZZARQ9QHA64
Blue Camouflage: ZZZ11ZZZHQ11Q91ZB1A
Blue Star: EEGJ2YRQQZ1IZ9QHA64
Green Flower: EEGJ2YRZQZAIQ9QHA64
Navy Hearts: EEGJ2YRZQZ1IQ9QHA64
Orange Diagonal: EEGJ2YRQQZAIQ9QHA64
Pink Vertical Stripes: EEGJ2YRQQQARQ9QHA64, ZZZ11ZZQ9QAAQ91ZB1A
White Paws: EEGJ2YRQQQ1RQ9QHA64
White Zebra Stripe: EEGJ2YRZZQ1IZ9QHA64
 
Fur Colors:
Blue: EEGJ2YRQZZAIQ9QHA64
Deep Red: EEGJ2YRQQQAIQ9QHA64
Goofy: EEGJ2YRQZQ1IZ9QHA64
Green: ZZZ11ZZZ9QA1Z91ZB1A
Light Green: EEGJ2YRZZQ1RQ9QHA64
Neon Yellow: EEGJ2YRZZQARQ9QHA64
Pink: EEGJ2YRQZZ1IZ9QHA64, ZZZ11ZZQHZ11Z91ZB1A
Purple: EEGJ2YRQQZARQ9QHA64
Neon Green: ZZZ11ZZZHQA1Q91ZB1A
 
Dogs:
Fur Patterns:
Bandit Mask: EEGJ2YRQZQARQ9QHA64, ZZZ11ZZQHQAAQ91ZB1A
Stars Coat Marking: EEGJ2YRZQZAIZ9QHA64, TB6IPB1R1FDMRIQT6DG
Zebra Stripes: EEGJ2YRZZQAIZ9QHA64
 
Fur Colors:
Blue: EEGJ2YRQQQ1IZ9QHA64
Deep Red: ZZZ11ZZQHQ1AQ91ZB1A, EEGJ2YRQZQ1RQ9QHA64
Green: EEGJ2YRQZQAIQ9QHA64
Light Green: ZZZ11ZZZ9Q1AQ91ZB1A
Neon Green: ZZZ11ZZZ9QA1Q91ZB1A
Neon Yellow: EEGJ2YRQQQAIZ9QHA64
Pink: EEGJ2YRZQZ1RQ9QHA64, ZZZ11ZZZ9Z1AQ91ZB1A
Purple: EEGJ2YRQQZAIZ9QHA64
Goofy: ZZZ11ZZZHZAAQ91ZB1A
 
Collars:
Black Dot: EEGJ2YRQZZ1IQ9QHA64
Black Smiley: ZZZ11ZZZ9QAAQ91ZB1A
Blue Camouflage: ZZZ11ZZZHZ1AQ91ZB1A, ZZZ11ZZZHQ11Q91ZB1A
Blue Star: ZZZ11ZZQHQ11Q91ZB1A, EEGJ2YRQZQ1IQ9QHA64
Green Flower: EEGJ2YRQZZ1RQ9QHA64
Navy Hearts: EEGJ2YRQQZ1IQ9QHA64
Orange Diagonal: EEGJ2YRZQZ1IZ9QHA64, ZZZ11ZZZ9Z11Z91ZB1A
Pink Vertical Stripe: ZZZ11ZZZHZA1Q91ZB1A
White Paws: ZZZ11ZZZ9Q11Z91ZB1A,
White Zebra: ZZZ11ZZZHZ11Q91ZB1A
Blue Bones: ZZZ11ZZZHZ11Z91ZB1A


Special thanks to everyone who helped provide these codes.
47  Simmers' Paradise / Sims 2 Videos / Video Posting rules.... on: September 23, 2006, 07:20:34 pm
The general rules of the forum still apply. I request people use Youtube to upload their videos. You can then insert the code into the thread so people can view your video without causing us bandwidth problems.
 
Enjoy!
48  Sims 2 Community Downloads / Teen/Young Adult / Tutorial: How to Package Genetics and Clothing for Upload on: March 29, 2006, 04:30:18 am
How to Package Genetics and Clothing for Upload

This tutorial is to help people package up their creations without packaging up an entire Sim. Although creating a sim2pack is the quickest and easiest way for you to share your creation, it isn’t the most user-friendly and is not recommended. Creating sims2packs (entire Sims) can cause a number of problems.

Although the first time you follow these steps to package up your creation properly might take awhile and although it looks like alot to read, once you’ve done it a few times, it will be fast, simple, and you wont have to worry about anybody complaining that you’ve uploaded an entire Sim (with custom content not specified) or that your recolor isn’t working (because you uploaded the wrong file). So here, finally, is the tutorial.


After you’ve created genetics or clothing in Bodyshop, you will find your creations in two places: your C:\My Documents\EA Games\The Sims 2\Projects folder and your C:\My Documents\EA Games\The Sims 2\SavedSims folder (your file directory may look different depending on your computer’s operating system but you should be able to find the projects and savedsims folder easily).

I am going to use a piece of clothing I have made as an example; its called jmadeoutfit. When I go to the projects folder I can find it clearly labeled jmadeoutfit.package in its own folder—but it needs to be left there because if it gets packaged up and uploaded, it wont work in anybody’s game.

To find the correct file, you need to go to the savedsims folder. In my savedsims folder, the file is called 5f261a21_jmadeoutfit.package so it was a little tricky to find. Look around for your file; it will have numbers in front of it then an underscore and then the title you gave it (like my example). After you've found the file, you need to decide how you're going to package it up so you can upload it later.

There are several ways to do this. The way that I do it may seem easy to some or the hard way to others but I’ve tried other ways and this just seems to be the quickest way for me.

1. Right-click on it and choose copy, then go to desktop and right-click somewhere in an empty space and choose paste.
2. Then right-click on the new file on the desktop and choose either “Add to 5f261a21_jmadeoutfit.rar” to make a rar file OR choose “Send to…compressed file” to make a zip file. (remember your file names will be different than mine and you may be using different compression software than my winrar and winzip)

Note #1: I recommend that you DO NOT rename your files--it may cause them NOT to work properly. You can rename the compressed rar or zip file if you want.
Note #2:This is the way I recommend doing it for ONE file, if you have more than one file--such as a bunch of recolors or if you’re adding a read-me or something with the file--it might be best to make a folder on your desktop to copy the files to and then either rar-ing or zip-ing the folder itself so the files will be in a group instead of separate.


If you’ve got both options (to rar or to zip), I would suggest going with rar because it tends to make the end-result compressed file smaller than zip does, although more people use zip, rar is just as easy to use.

And now you have yourself a compressed file to upload. Feel free to delete the .package file still on your desktop, you don’t need it now. Now go to wherever site you’re going to post the creation on (hopefully this one :lol:) and upload your zip or rar file and don’t forgot to include screenshots!


Posted by Jessica!
49  Sims 2 Community Downloads / Elder/Adult / Tutorial: How to Package Genetics and Clothing for Upload on: March 29, 2006, 04:29:19 am
How to Package Genetics and Clothing for Upload

This tutorial is to help people package up their creations without packaging up an entire Sim. Although creating a sim2pack is the quickest and easiest way for you to share your creation, it isn’t the most user-friendly and is not recommended. Creating sims2packs (entire Sims) can cause a number of problems.

Although the first time you follow these steps to package up your creation properly might take awhile and although it looks like alot to read, once you’ve done it a few times, it will be fast, simple, and you wont have to worry about anybody complaining that you’ve uploaded an entire Sim (with custom content not specified) or that your recolor isn’t working (because you uploaded the wrong file). So here, finally, is the tutorial.


After you’ve created genetics or clothing in Bodyshop, you will find your creations in two places: your C:\My Documents\EA Games\The Sims 2\Projects folder and your C:\My Documents\EA Games\The Sims 2\SavedSims folder (your file directory may look different depending on your computer’s operating system but you should be able to find the projects and savedsims folder easily).

I am going to use a piece of clothing I have made as an example; its called jmadeoutfit. When I go to the projects folder I can find it clearly labeled jmadeoutfit.package in its own folder—but it needs to be left there because if it gets packaged up and uploaded, it wont work in anybody’s game.

To find the correct file, you need to go to the savedsims folder. In my savedsims folder, the file is called 5f261a21_jmadeoutfit.package so it was a little tricky to find. Look around for your file; it will have numbers in front of it then an underscore and then the title you gave it (like my example). After you've found the file, you need to decide how you're going to package it up so you can upload it later.

There are several ways to do this. The way that I do it may seem easy to some or the hard way to others but I’ve tried other ways and this just seems to be the quickest way for me.

1. Right-click on it and choose copy, then go to desktop and right-click somewhere in an empty space and choose paste.
2. Then right-click on the new file on the desktop and choose either “Add to 5f261a21_jmadeoutfit.rar” to make a rar file OR choose “Send to…compressed file” to make a zip file. (remember your file names will be different than mine and you may be using different compression software than my winrar and winzip)

Note #1: I recommend that you DO NOT rename your files--it may cause them NOT to work properly. You can rename the compressed rar or zip file if you want.
Note #2:This is the way I recommend doing it for ONE file, if you have more than one file--such as a bunch of recolors or if you’re adding a read-me or something with the file--it might be best to make a folder on your desktop to copy the files to and then either rar-ing or zip-ing the folder itself so the files will be in a group instead of separate.


If you’ve got both options (to rar or to zip), I would suggest going with rar because it tends to make the end-result compressed file smaller than zip does, although more people use zip, rar is just as easy to use.

And now you have yourself a compressed file to upload. Feel free to delete the .package file still on your desktop, you don’t need it now. Now go to wherever site you’re going to post the creation on (hopefully this one :lol:) and upload your zip or rar file and don’t forgot to include screenshots!


Posted by Jessica!
50  Simmers' Paradise / General Sims 2 Discussion / The "CEP" - Color Enable Package v. 8.1 - 18 MAY 2008 on: March 14, 2006, 12:37:21 am
Numenor has updated with a new CEP. You can find it here.
51  Simmers' Paradise / General Sims 2 Help / Having problems installing files? on: December 24, 2005, 07:36:09 pm
Delphy from MTS2 made an installer that will install files for you after you select them. This works for zip, rar and sims2pack file formats.
More detailed information can be found here: http://www.modthesims2.com/showthread.php?t=114531
and the url for the site can be found here: http://q-xpress.modthesims2.com
Not only does it work for MTS2 downloads but will install for other sites too.
52  Simmers' Paradise / General Sims 2 Help / Custom Content not displaying in Nightlife on: September 15, 2005, 11:05:15 am
I have seen other people with this issue but no solution and with MTS2 being down right now I figure it wouldn't hurt to ask here. My custom objects/recolors appear perfectly fine. However my custom skins/hair/makeup does not appear. Only a few pieces that were left in bodyshop. The custom clothing/makeup appears on said sims that were created before NightLife was installed though. When I installed the game I first moved my downloads folder to my desktop and then loaded the game and enabled the content and then exited and replaced the folder. I don't know if that has anything to do with it or not but I really don't want to reinstall all 3 games to find out. So any ideas/solutions would be welcomed.
53  Simmers' Paradise / Tutorials / Wizards of SimPE Recoloring Tutorial on: August 29, 2005, 07:34:07 pm
Hi I decided to make a new object recoloring tutorial. This tutorial is compatiable with the latest version of SimPE. I will try to be as clear as possible but if you have any problems or questions please let me know.
 
Ok first on the bottom leftt hand side of your screen click start (or where ever you have it). Go to programs. Scroll down until you see SimPE and click it and select Wizards of SimPE.

 
Ok now that the Wizards of SimPE has loaded you should have a screen like so

 
Now click on the link that says recolors and it will begin to load all of the Maxis items. Note it does not load custom content not made by Maxis however I will do a brief tutorial for that. You will notice it is a little slow loading but a progress bar on the bottom left corner will track the progress of loading the objects.
 
Now you should have a screen like this....

 
Now simply select the object you wish to recolor and click next.

 
Ok now you will appear at the next screen. I used the colonial bed as my example. You will see the Default Maxis bedframes and comforters. Select a bedframe and blanket and click next. Or you can do each one seperate so if someone wants to delete the one without deleting them both they can.

 
Ok now select the texture which you wish to recolor first and click export. Select which texture to export- name this texture and ssave it to your desktop.... minimize simpe and open that png file in the art program of your choice.... color it with your new design and save..... when you are done coloring go back into simpe and hit import and it will change to your new texture file. Repeat this on the next texture file if there is one and then click next. Make sure you save the file as a .png!!!

 
Now you will name your package file and it will be saved to your downloads folder and thats it. You have now recolored an object!

 
I have also included a version for you to download as well.
54  Sims 2 Community Downloads / Accessories / Make-up & Accessories on: July 17, 2005, 11:44:31 am
This is where I'll share all the accessories I make for the sims 2, or any that are requested of me. Smiley I'll be uploading some of the make-up I have made in the next few days.
55  Simmers' Paradise / Tutorials / Grykons Milkshape Tutorial for Mesh Editing on: June 30, 2005, 03:01:32 pm
This tutorial is done by Tim. This zip contains a web archive. Enjoy!
Repacked by dajunkhere
Pages: 1 2 3 [4]

Powered by MySQL Powered by PHP Powered by SMF 1.1.21 | SMF © 2015, Simple Machines Valid XHTML 1.0! Valid CSS!
Page created in 0.858 seconds with 29 queries.
SimplePortal 2.1.1