Show Posts Show Posts
|
|
Pages: [1] 2
|
|
2
|
Simmers' Paradise / General Sims 2 Discussion / Is it true about teleporting?
|
on: September 23, 2007, 01:39:19 pm
|
|
My sim learnt to teleport from the Ninja. He appears after roughly 30 seconds (real life time) in either the Zen Garden or the Pagoda and Market place (probably haven't got the names right) in the Fat Eastern vacation place.
He appears in a puff of smoke and then you have to quickly ask to learn to teleport before he goes. Once you speak to him he will ask you a question (with 50/50 chance) to see if you "are worthy". I spent ages doing this and finally after 7 attempts she learnt it.
If you get the answer wrong you have to go out of the lot and come back in for him to appear. Only one person can ask him per trip to that lot.
Well.. thats what happened with me anyway..
|
|
|
|
|
3
|
Simmers' Paradise / Contests & Challenges / How to take a good picture (IMO)
|
on: September 14, 2007, 08:43:21 am
|
Hey Guys
I've heard that a few people are having trouble with their pictures and getting eliminated out of contests at applications. So I thought I'd do this tutorial to show you some tips for when taking your pictures.
1. Printscreen Pictures:
For ages I used the in game camera to do all my pictures and luckily for me I have a great graphics card so they turned out okay but not great. Then one marvellous day I found the Gadwin PrintScreen and ever since then I've used it! It is simply fantastic! You can take full screen shots and then edit them and resize them later. I would reccomend anyone who doesn't have Gadwin PrintScreen or a similar program to get it!
You can get it here. Scroll down and you'll find it at the bottom of the link. It's called 'Gadwin PrintScreen'.
Tip: Once you've sucessfully downloaded and installed it, make sure you sort the settings out. You can get it to start up automatically when your computer is turned on (good for forgetful people like me!) and you can get previews of the shots you take (I don't use this but others may do).
2. Editting your pictures:
If you don't have Photoshop or any other image editting programme I strongly suggest you get GIMP! It's absolutely free! It is what I use and it is great. I won't go into much detail about editting your pictures because I've already written some tutorials (for GIMP) on how I personally edit my pictures.
Here are some links to my tutorials:
Warming Effect
How I Edit My Pictures
Multi-tone Pictures
Changing Background
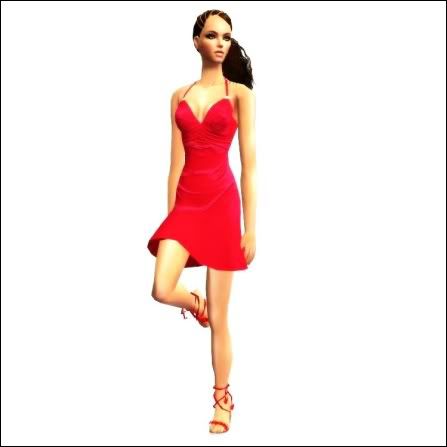
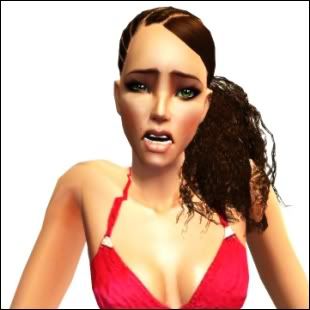
Before Editting:
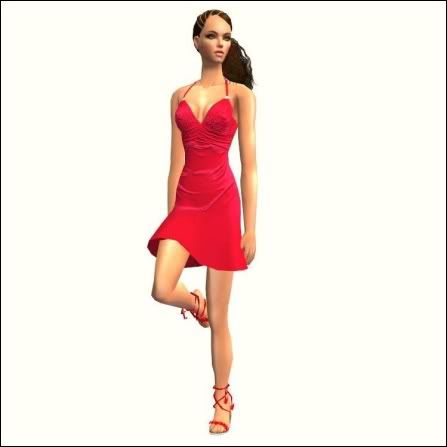
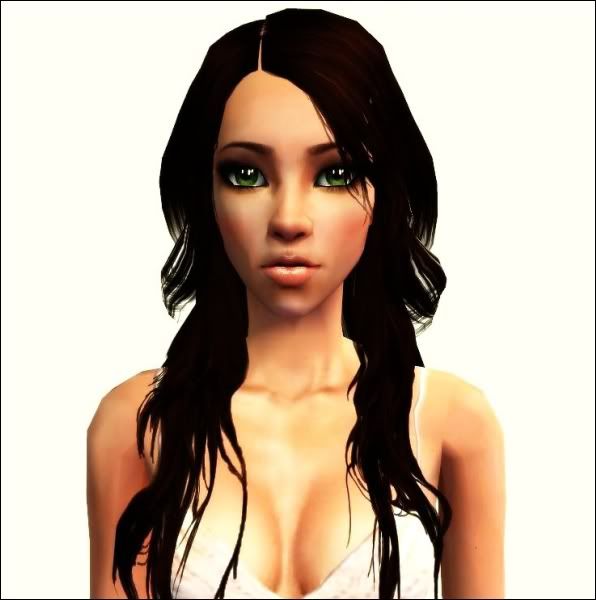
After Editting:
There are many other people who are even better at editting pictures and I'm sure they won't mind if you ask them for a few tips. People here at InSim are friendly. We (sometimes) don't bite.
3. Types of shots:
There are many types of pictures that hosts can ask you to do. Two of the most popular are headshot and bodyshot. I'll focus on these for now but if you need any help you can PM me or someone else 
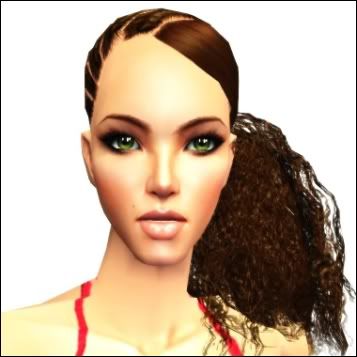
Headshot:
Generally, when a host asks for a headshot they are looking for a picture showing the top of the hair to the collarbone. Sometimes people (myself included) zoom too far out which can make it harder to see the detail of your pretty Sim's face! The trick is to fill up as much of the picture with your Sim without cutting the hair or forehead out. I would also live about a 1cm gap at the top and bottom of the picture but that is just a preference.
Here is how I would do a headshot:
...and how I wouldn't do a headshot:
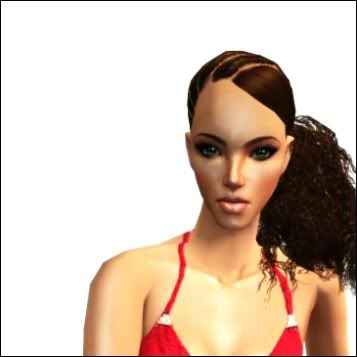
Once you've practised doing a basic headshot and got that right you can try and me more adventurous!
Even though they are exactly the same Sim, in exactly the same place, using exactly the same pose, they look different. Don't be tempted to just go for a head-on headshot.
It is important that you can see the face of the Sim but you don't have to be head-on when taking the photo. Experiment with angles!
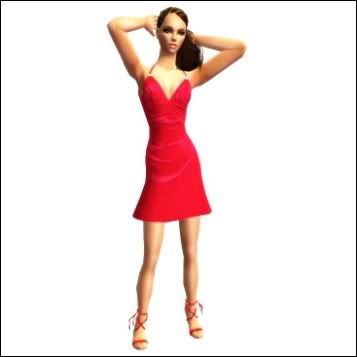
Bodyshot:
When a host asks for a bodyshot it is important that you show ALL the body. When I judge contests, I don't like seeing bodyshots of Sims with no feet! I want to see everything! Now when I do bodyshots I tend to do standing poses but lately I've seen lots of people do poses of Sims sitting down. These can look great so you can do either, as long as the host is okay with it. Once again, I would leave a 1cm gap at the top and bottom of the picture but that is just a preference.
Here is how I would do a bodyshot:
...and how I wouldn't do a bodyshot:
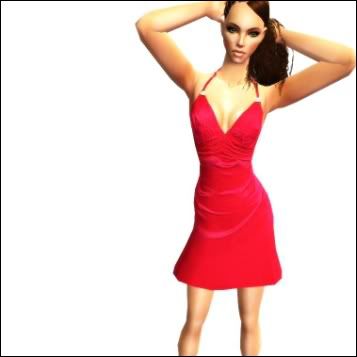
Just like the headshot, experiement with all the poses and don't be scared to try something a little different! Judges like to see unique ideas in pictures!
Poses:
There are absolutely thousands of poses you can get in the game. There are many hacks that you can get which help you with these (Hula Hack, Decorgals Pose Box, etc.) but you can also achieve great results from just playing around in the game, using the everyday animations, pausing the game and finding great poses.
Tip: Using the slowmotion cheat works great. Press Ctrl Alt + C to get the cheat box up and then type in 'slowmotion *number between 0-8*'. I use 'slowmotion 5' but it is up to you!
Here are a few great poses:
Shy
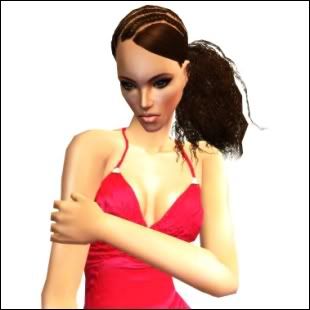
How I did it: Being flirted with.
Secretive:
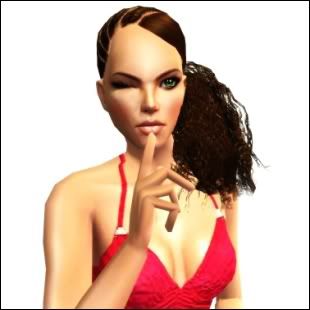
How I did it: Gossiping.
Evil:
How I did it: Scope Room.
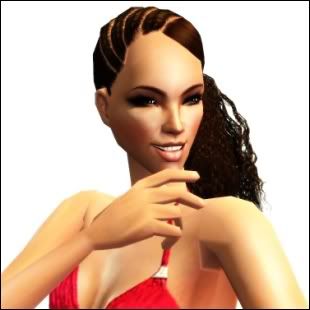
Happy:

How I did it: Catching Butterflies.
Angry:
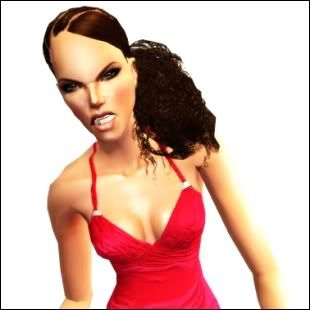
How I did it: Tell them to go somewhere they can't get to.
Confused:
How I did it: Tell them to go somewhere they can't get to.
So basically. Experiment with all that Maxis (and other Sim addicts) have given you and you'll surely be able to get some fantastic pictures!
If you want to you can PM me for help or comments on your pictures and I'll be brutally honest.
Hope this helps someone and I haven't just wasted the past few hours! LOL
Charlotte xXx [/FONT] |
|
|
|
|
4
|
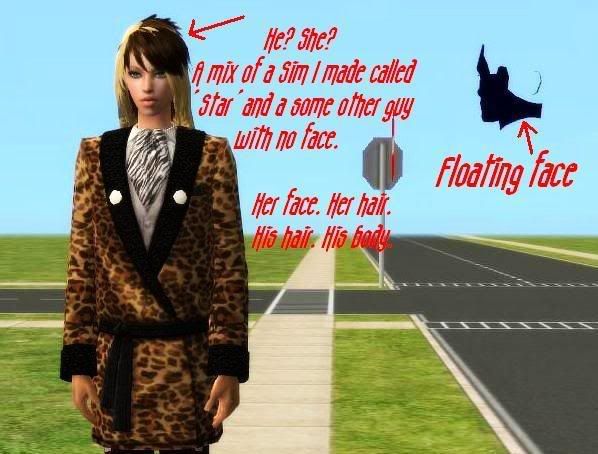
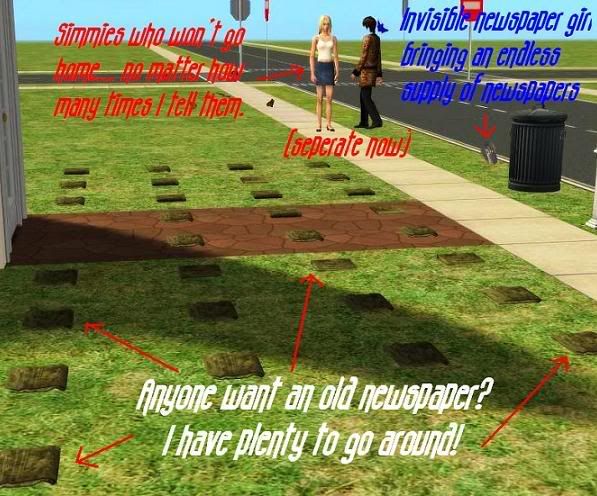
Simmers' Paradise / General Sims 2 Discussion / List your Bon Vonyage bugs and compatabilty issues
|
on: September 08, 2007, 11:18:56 am
|
I actually found that I hadn't taken InTeenimator out and that solved most of the problems until my computer decided to restart itself. I dunno if thats BV's fault though. I've had that problem before but I thought I'd sorted it. It hadn't restarted itself in ages until just now  My sims were on their honeymoon as well My game wasn't slow in the slightest though. Which is great |
|
|
|
|
7
|
Sims 2 Community Downloads / Custom Sims / Milly Rose
|
on: August 02, 2007, 04:21:28 pm
|
Hey. Here is Milly. I changed her clothes and hair because I think they were paysite.
The original Milly had clothes from SimChic and hair from TSR.
Content Included:
Eyes:
Olive Eyes by Enayla
Eyeshadow:
Intense Colour - Brown By Helaene
Mascara:
Hollywood Lashes By Helaene
Masks (Like foundations):
Glamour Gloss by tabbs and Fresh Teint by icedmango
Skin:
Mid by Louis @ SimScribbling
This is Millys hair. It isn't included. So download it
I tried uploading it on here and it said that it was an invalid file so I'm using that website that Alissa used instead. Click here.
PLEASE DO NOT DOWNLOAD MILLY AND PRETEND SHES YOUR OWN. DON'T ENTER HER IN CONTESTS OR NOTHING LIKE THAT (USE HER IN YOUR X-MEN PICTURES THOUGH BY ALL MEANS!) SHES MINE! |
|
|
|
|
10
|
Simmers' Paradise / Contests & Challenges / Selection Tutorials (as requested by dnj121006)
|
on: July 30, 2007, 01:04:14 pm
|
Hey. This is a tutorial on how to select a sim (or another object) from a plain background and placing it onto another background. I want to cut the sim out of this picture: 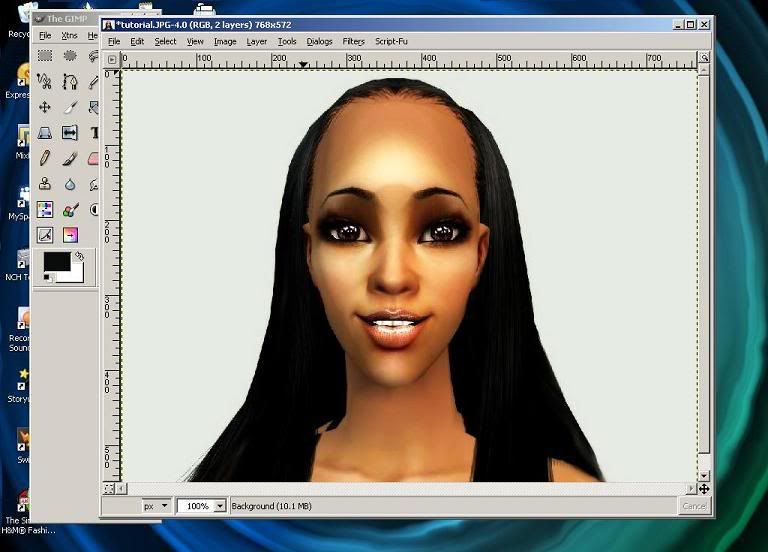 and put it onto this picture: 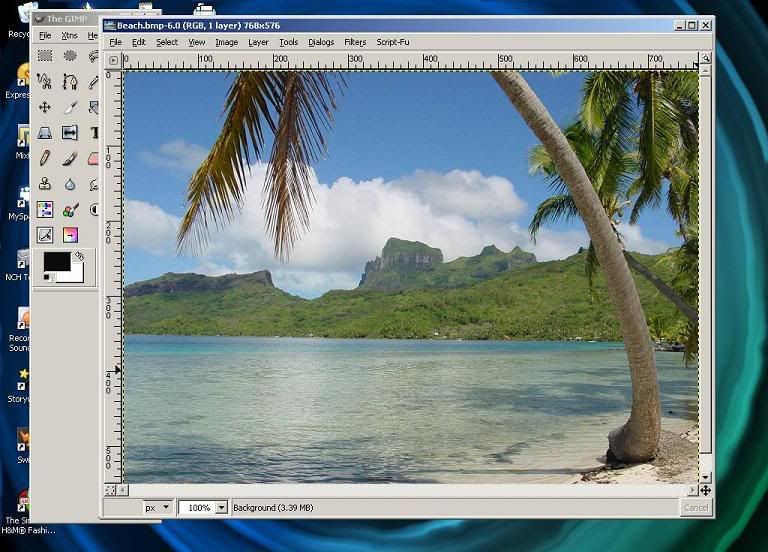 First of all you need to select the wand tool from the Gimp menu.  Next, you hold down the left mouse button on an area of the background (the area I clicked is idicated by the red dot) and you will notice a zig-zag line appears around your picture (still hold the left button down) 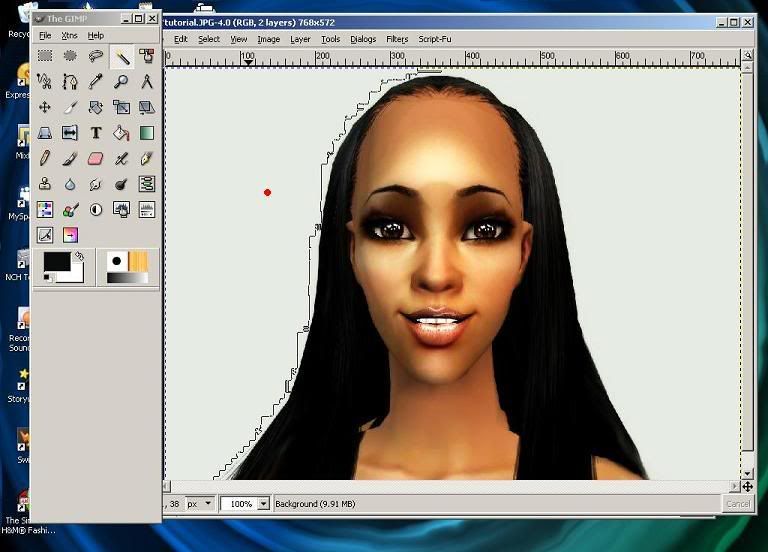 Now drag the mouse down a little until that zig-zag line changes to fit the shape of the thing you want to select, in this case my sim, Aiyana.  Once the line has changed you can let go of the mouse and a black and white line should appear around your selection.  Then, right click on the selection (not the background) and click Select > Selection Editor A box should appear. Click on the Invert selection button and make sure your selection is shown in white in the preview panel, and the background is black. Once you've done this you can close that little box. 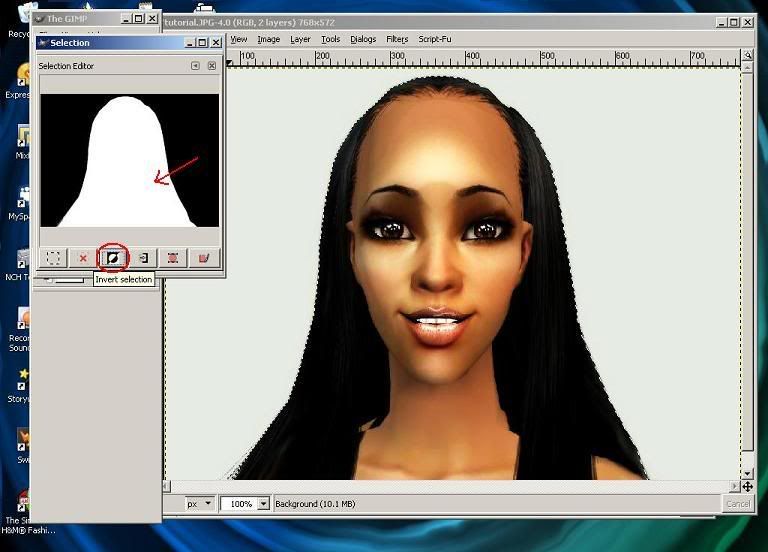 Now you can right click on the selection again and this time choose Edit > Cut. 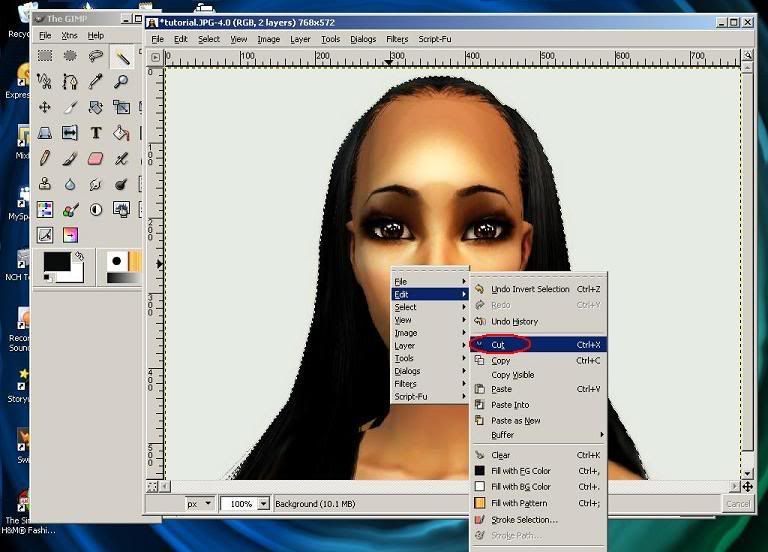 Next, open up the picture of whatever you want to post it onto (in this case a beach scene) and right click and select Edit > Paste. 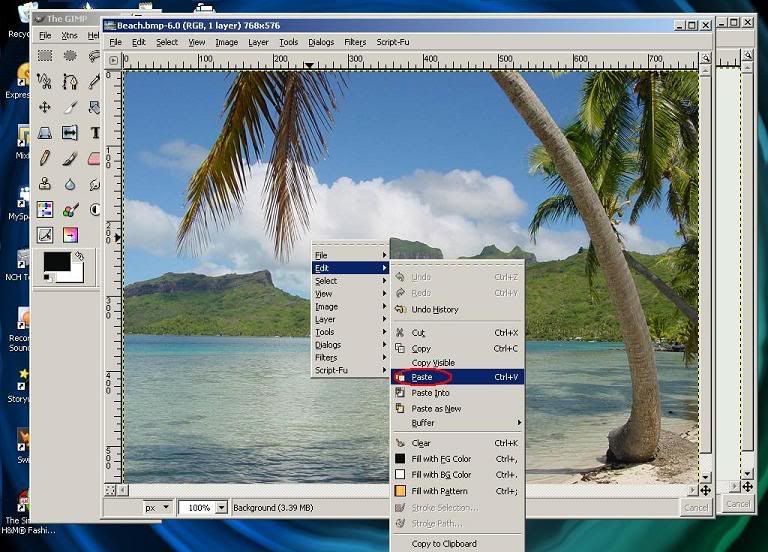 You should have something like this. As you can see the selection is floating. 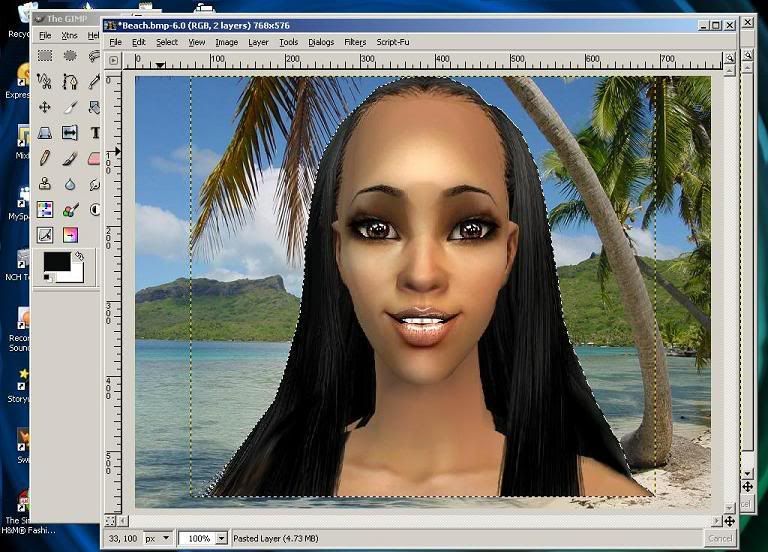 If you want to move the selection click off the wand tool (I usually choose the lasso icon or the box selection icon - the one circled in the picture) and then it will allow you to move your selection. When you're happy click and you should have something like this: 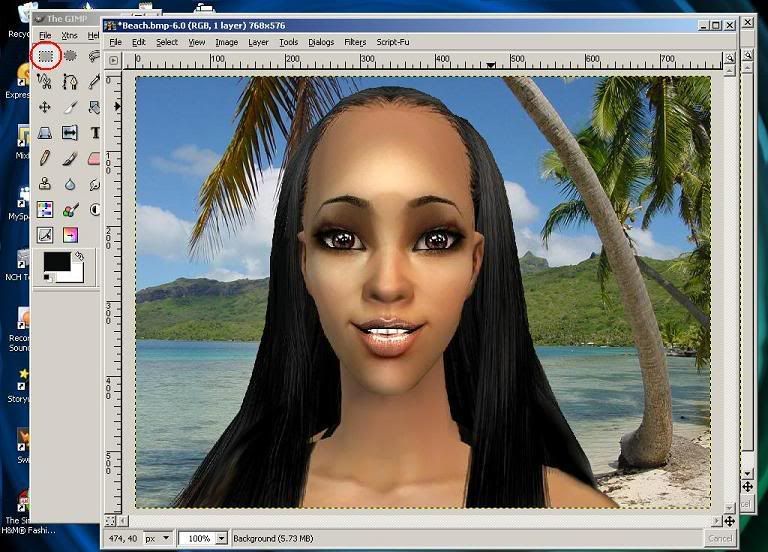 Welldone you've done it! If you'd like to brighten up your picture why not try my other tutorials so you end up with something like this: 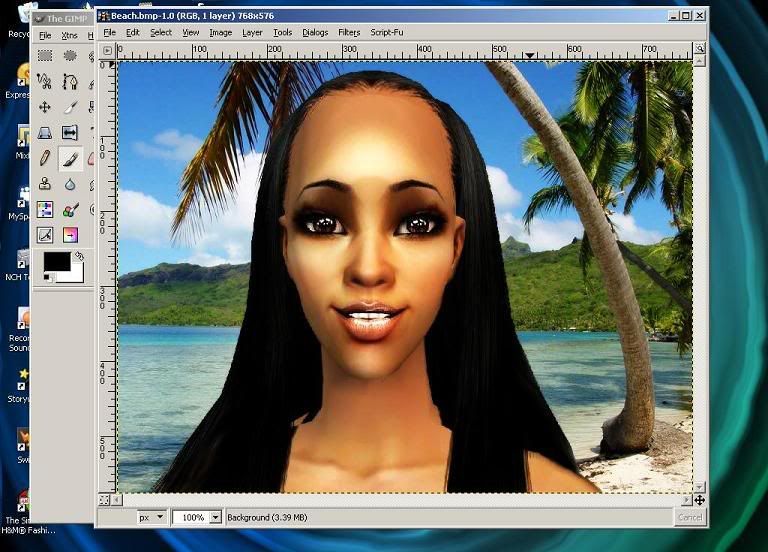 [/SIZE] |
|
|
|
|
11
|
Simmers' Paradise / Contests & Challenges / Something kinda cool...
|
on: July 07, 2007, 04:50:03 pm
|
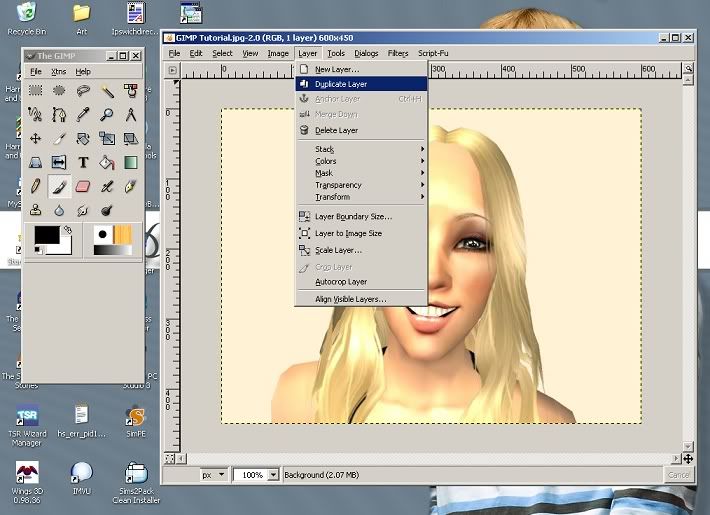
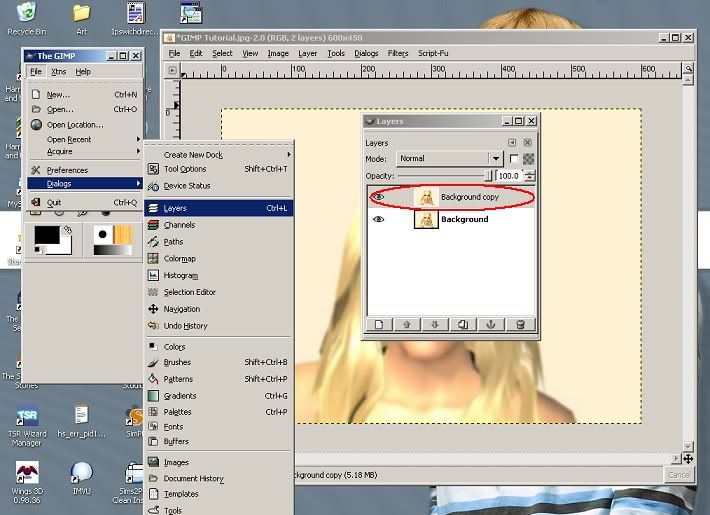
Hey... I've got hooked on tutorials! This is something kinda cool that I thought might come in handy when doing contests. It allows you to use both colour and black and white in the same image. Hope you like it! 1) Okay, so heres the image I want to use. 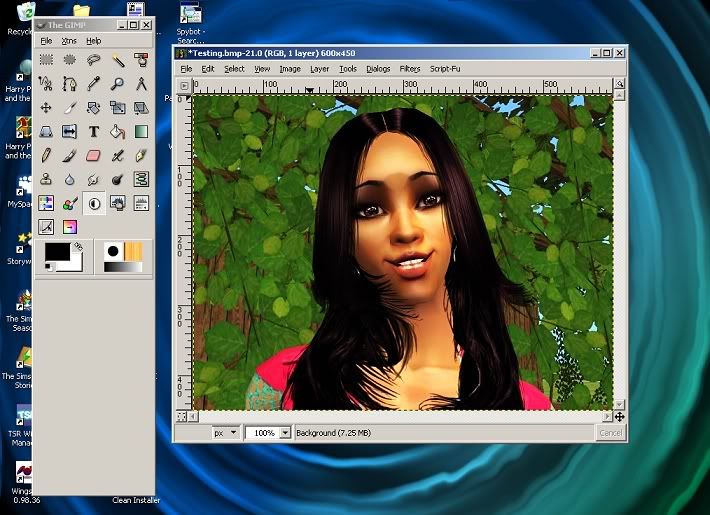 2) We then want to duplicate it. To do this you go to Layer > Duplicate Layer. Note: It will look as if nothing has happened.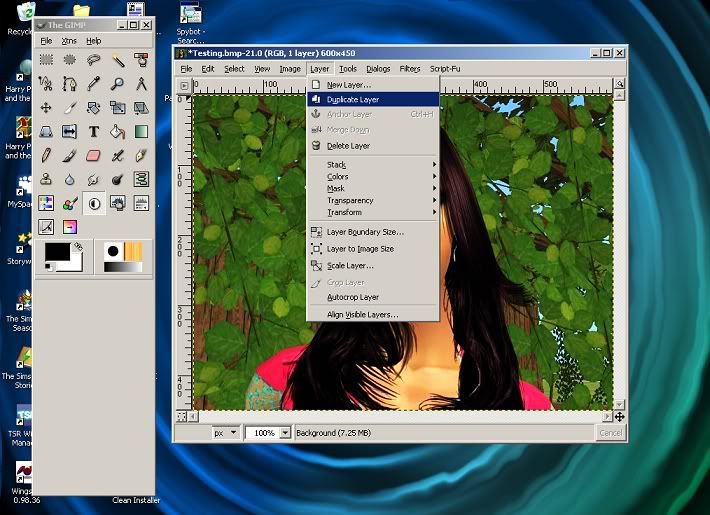 3) Then, we need to pull up the Layers dialog. To do this you go to File > Dialogs > Layers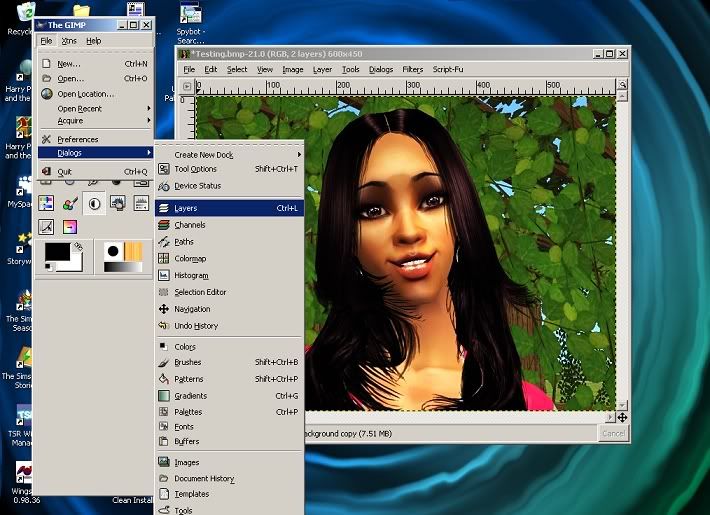 4) A box should then appear. You will need to select the Background copy and make sure it is visible by clicking on the eye symbol. 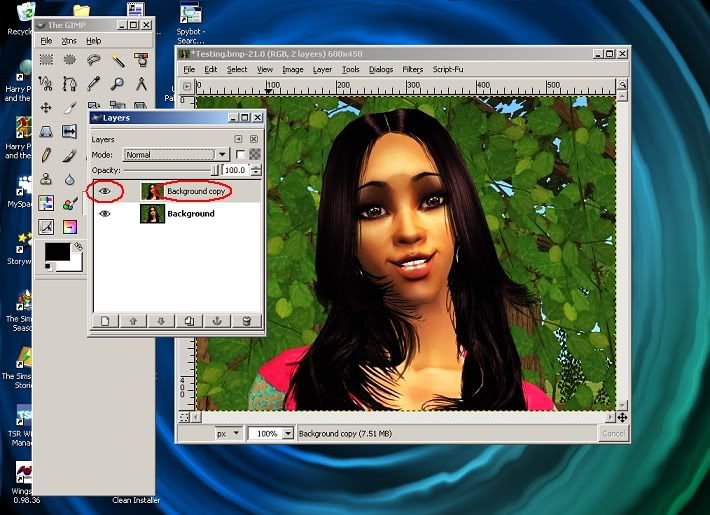 5) Now that the Background copy is selected, we want to turn it to black and white. To do this you go to Layer > Colors > Desaturate. 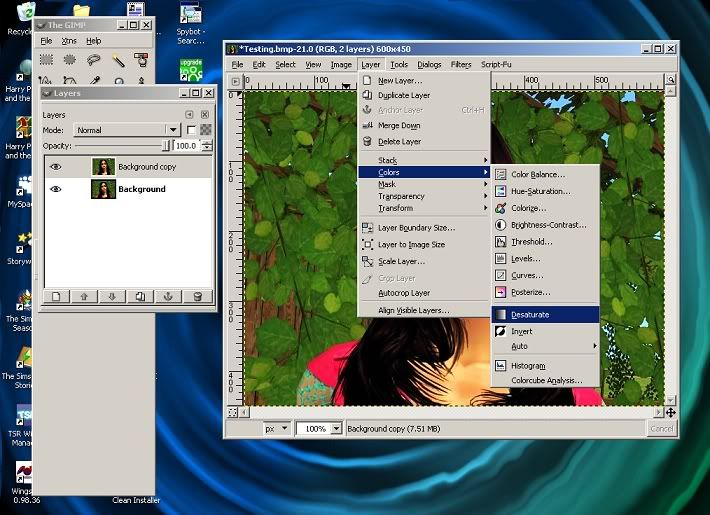 6) The image should now be in black and white. Now, in the Layer dialog you need to right click on the Background copy and select Add Layer Mask...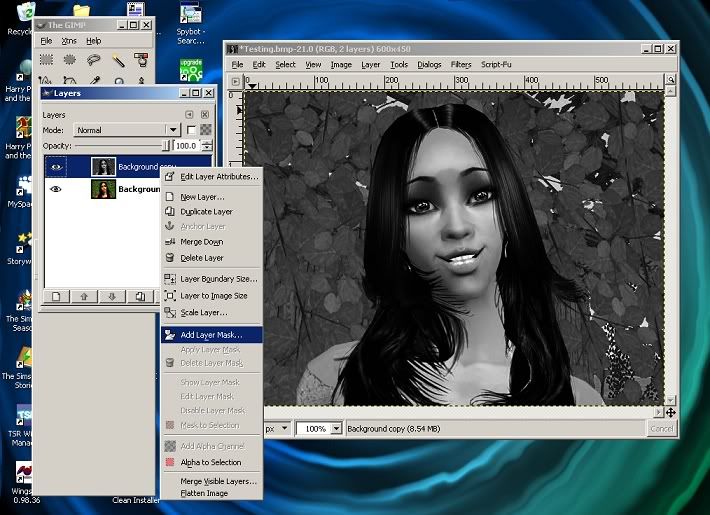 7) A box should then appear. Make sure the White (full capacity) is selected and then click OK. 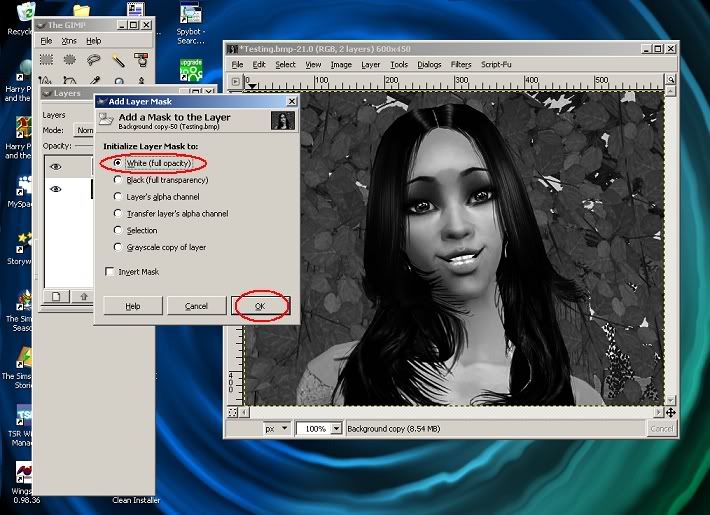 8 ) Now make sure that the Background copy is selected and both of the layers are visible by clicking on the eye symbols. 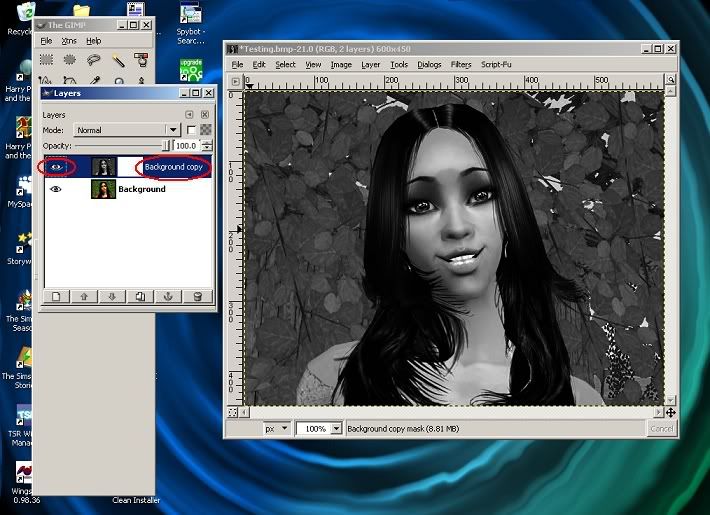 9) Next, select the brush tool. Remember you can change the size and shape of your brush by double clicking on the button. 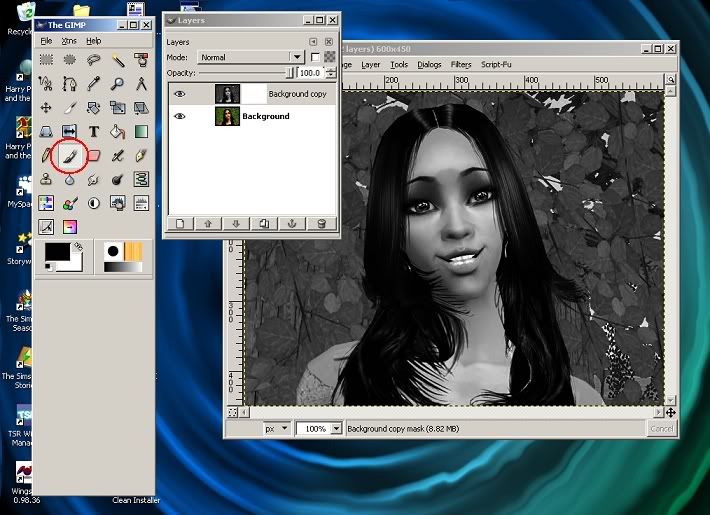 10) Now, when you use the brush tool on the black and white layer, the colours from the colour layer will show through. This can give quite a nice effect if you use it on a few small parts parts e.g. eyes or lips, or if you use it only on the background or main subject of the image like a sim or an object.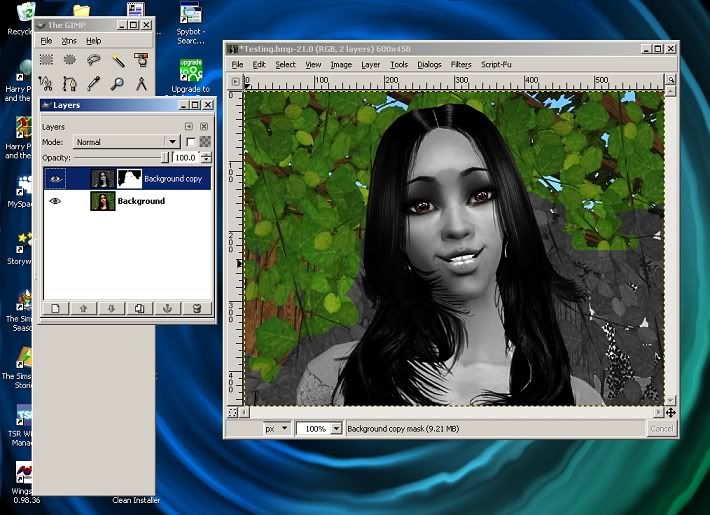 [/SIZE] |
|
|
|
|
13
|
Simmers' Paradise / Contests & Challenges / Another thing you might like to do...
|
on: July 06, 2007, 12:31:26 pm
|
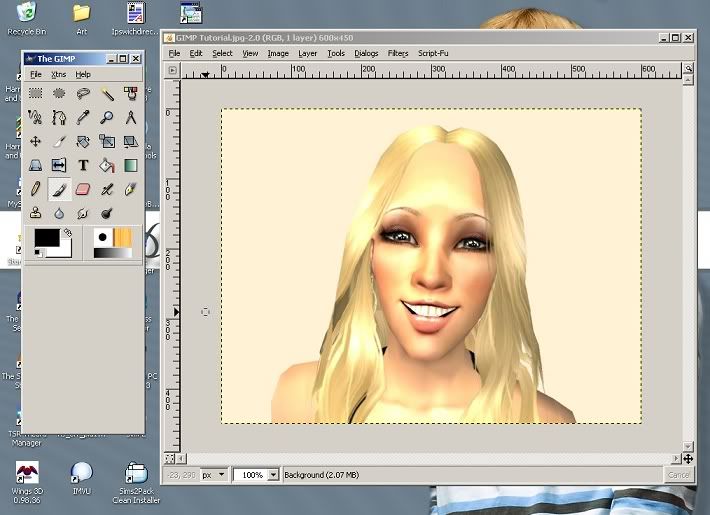
Hey again... This is how I personally edit my pictures using GIMP. I think they turn out pretty well so for those who are having trouble with it, here is a little tutorial. Once again, I'll say I am not an expert, I'm just trying to help. 1) Okay, I had this picture that I had used the warming effect on. I now want to edit it to make it look even better. First, I pulled up the Layers dialog ( File > Dialogs > Layers). I then selected the 'Background' and not the 'Background copy'. 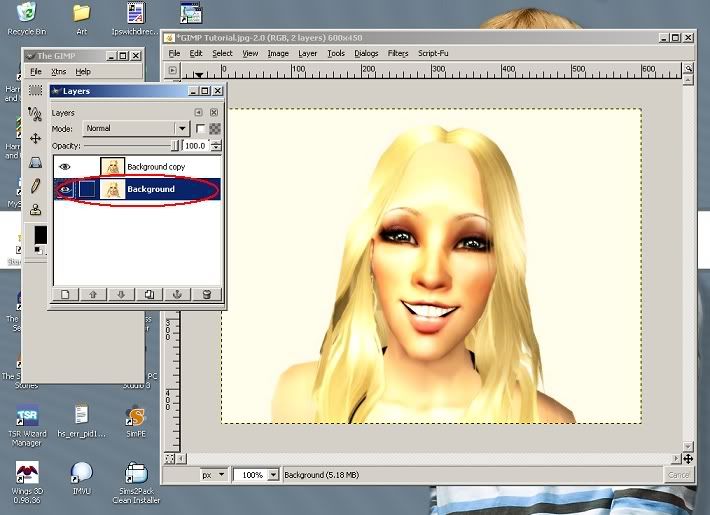 2) Then I wanted to adjust the Brightness and the Contrast. To do this you go to Layer > Colors > Brightness-Contrast... . 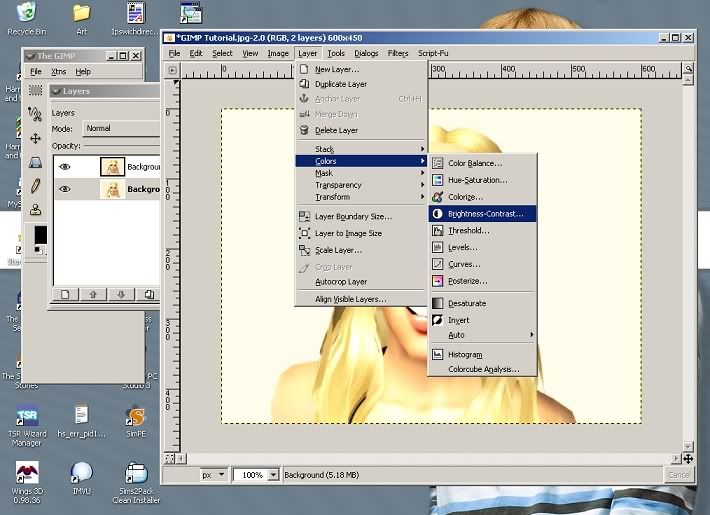 3) A box should then appear. Make sure the preview box is selected so that you can see what changes you are making to your work. Then use the up and down arrows to adjust the Brightness and Contrast. When you are happy, click OK. Note: The settings I used will most probably be different to the settings you will use for your image. Just play around until you are happy.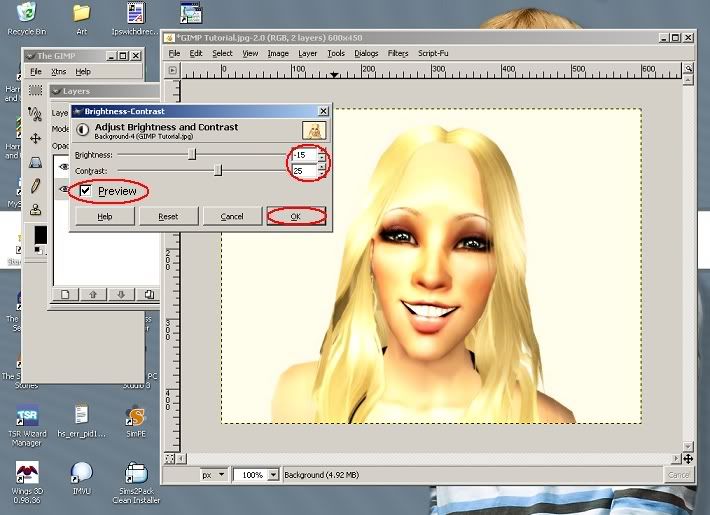 4) Next, I wanted to Sharpen my image. To do this you go to Filters > Enhance > Sharpen... 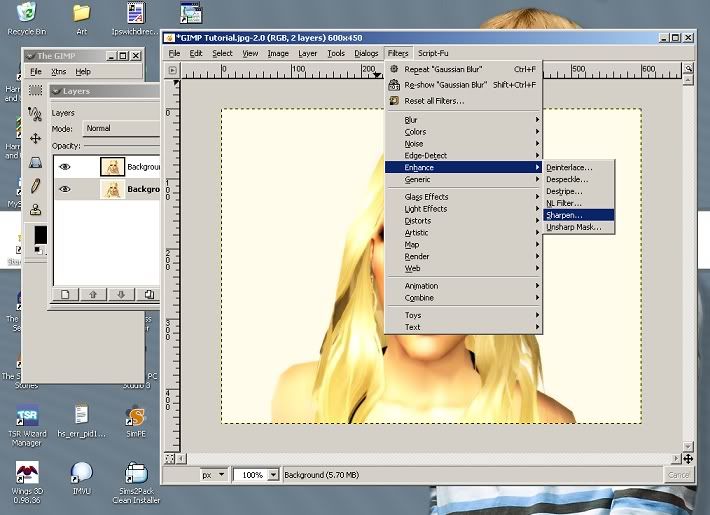 5) A box should then appear. Once again, make sure the preview box is selected so that you can see what changes you are making to your work. Then use the up and down arrows to adjust the Sharpness. When you are happy, click OK. Note: The settings I used will most probably be different to the settings you will use for your image. Just play around until you are happy.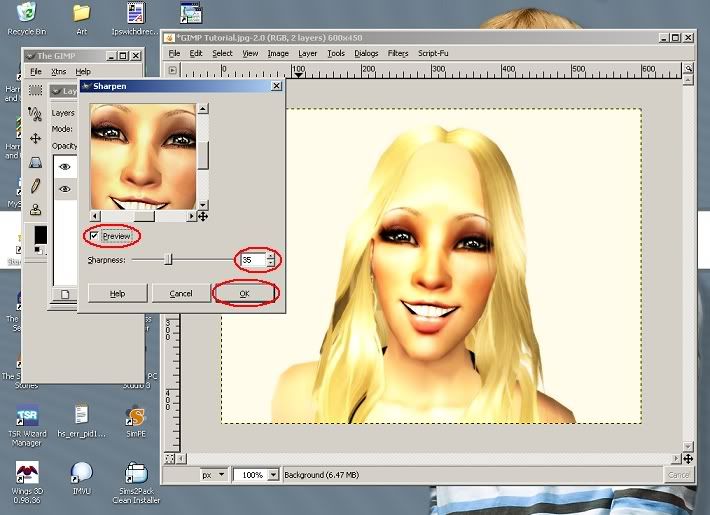 6) This is what the picture looks like now. I think the Sharpening tool makes the Sims eyes look so much better. 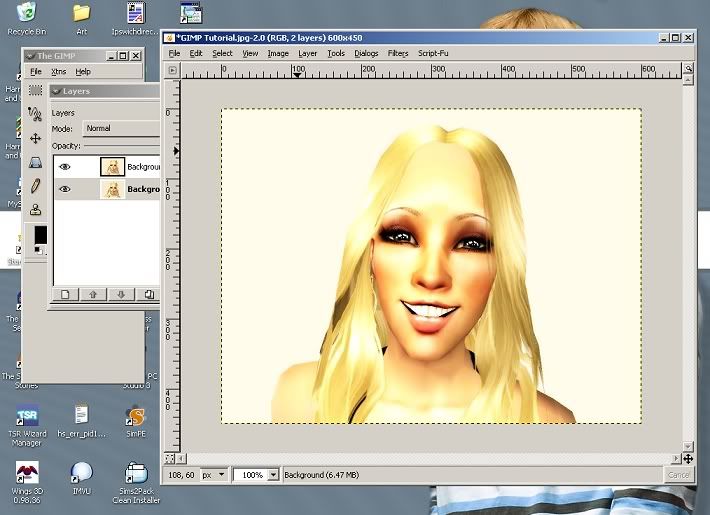 7) Next, I added a Softglow effect. To do this you go to Filters > Artistic > Softglow... . 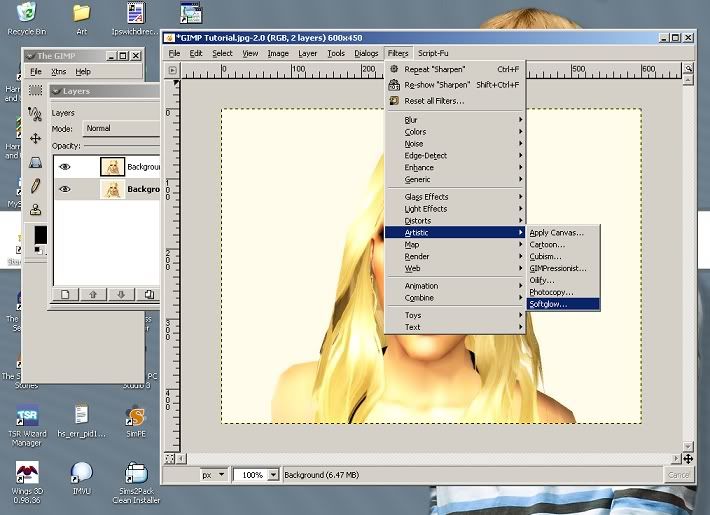 8 ) A box should then appear. Again, make sure the preview box is selected so that you can see what changes you are making to your work. Then use the up and down arrows to adjust the Glow radius, Brightness and Sharpness . When you are happy, click OK. Note: The settings I used will most probably be different to the settings you will use for your image. Just play around until you are happy.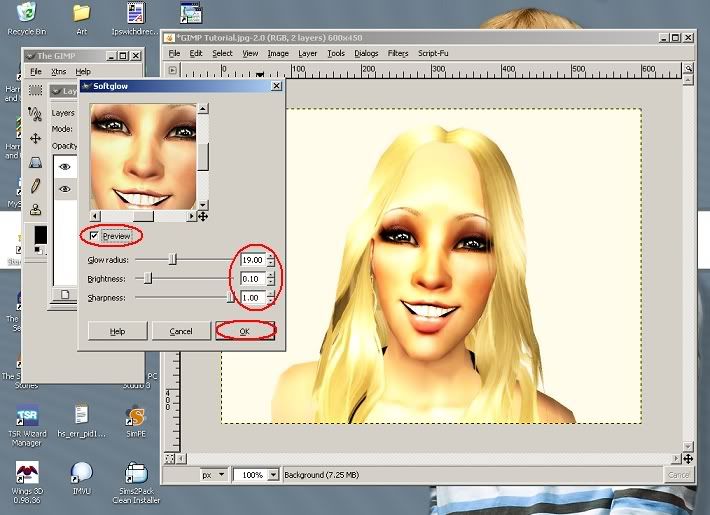 9) That is basically all I do. But one last thing you must do is Flatten the image. To do this go to Image > Flatten Image. 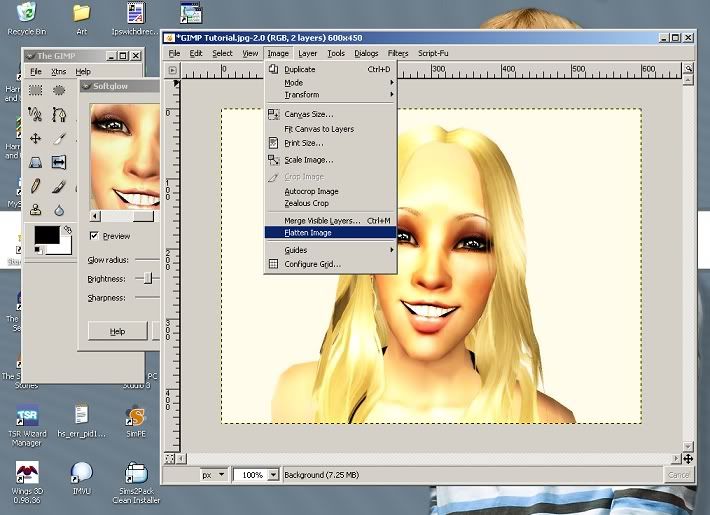 10) Here is a picture of my finished product: 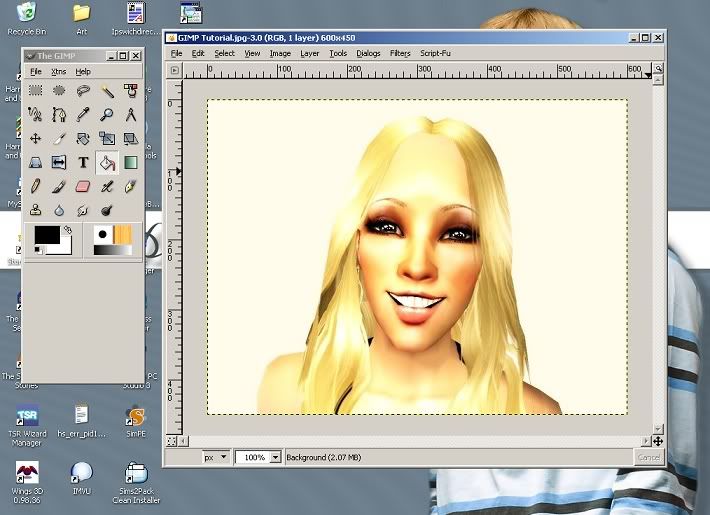 Remember: Remember: Save it! [/SIZE] |
|
|
|
|
14
|
Simmers' Paradise / Contests & Challenges / For those who don't know how...
|
on: July 06, 2007, 12:09:58 pm
|
Hey.. Well.. I noticed there was a 'Warming Effect' tutorial for photoshop and some people were having trouble because they had GIMP instead (like not knowing where things were), and I'm not an expert but I thought seeing as I know the answer, I could help you out.
So I made this little tutorial because I was bored.. and I hope it helps.
1) This is the picture I begun with. I wanted to make it look better so I used the following steps to help me...
2) Okay, so first I duplicated the layer and to do this you need to go to Layer > Duplicate Layer. Note: Once you have clicked on this, it will seem as if nothing has happened.
3) Then, I added a Gaussian Blur and to do this you need to go to Filters > Blur > Guassian Blur...
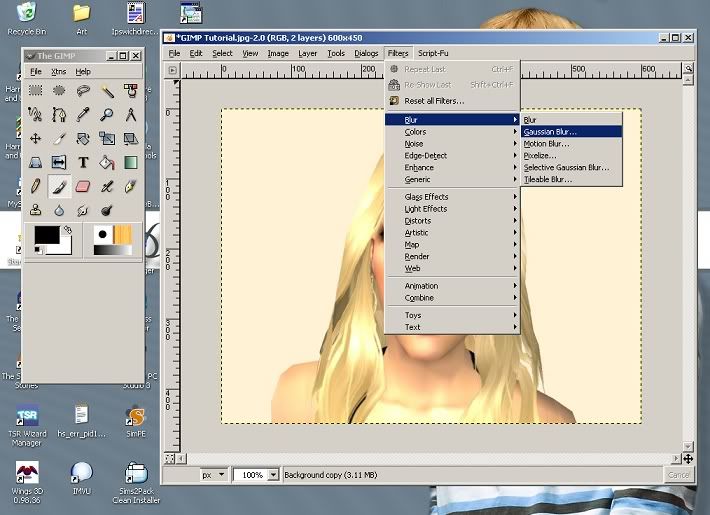
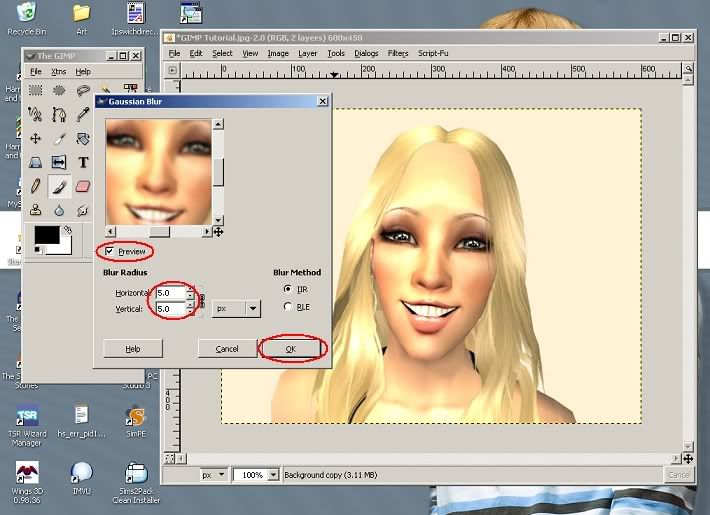
4) A box should then appear. Make sure the preview is selected so that you can see the changes you are making to your work. Then use the small up and down arrows to change the Blur Radius. I think it is best to use between 2-5. Once you have done, click OK. Note: The Blur Radius settings I used for my picture will most probably be different to the settings you need for your picture, thats why it is important to have the preview selected so you can see what is happening. Just play around with the settings until you are happy.
5) Your picture should then turn blurry. Now you need to pull up the Layers dialog. To do this go to File > Dialogs > Layers. The dialog should then appear, make sure the 'Background copy' is selected before moving on to the next step.
6) Then, you need to click on the drop down menu and select 'Overlay'.
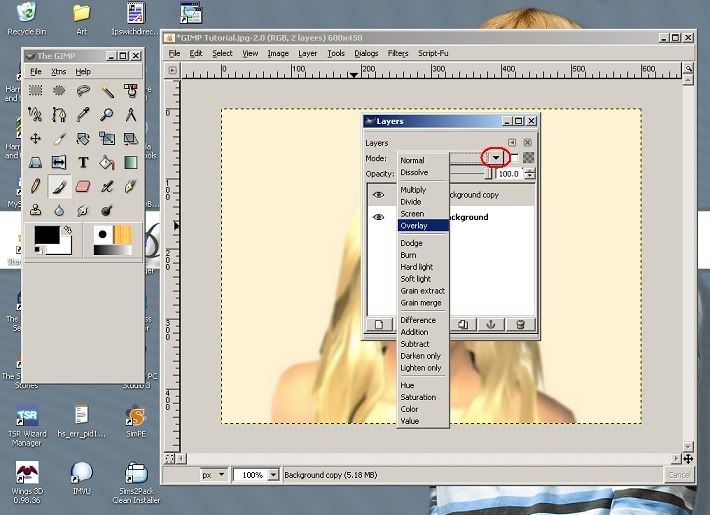
7) And that is how you add a 'Warming Effect' to your picture using GIMP. This is the finished product:
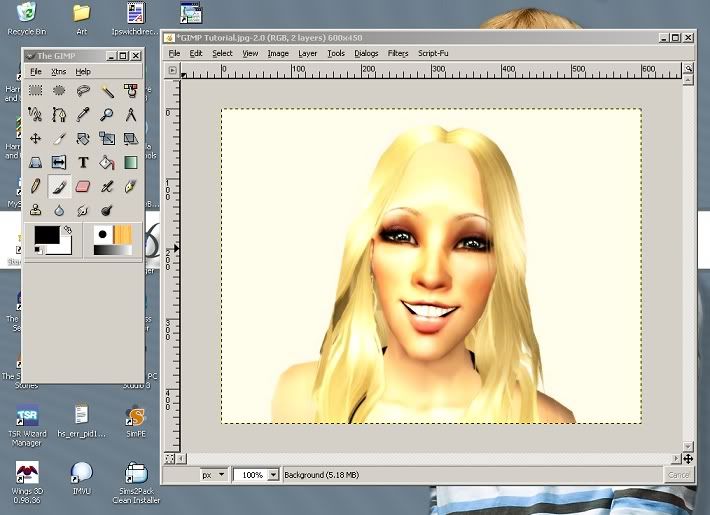
Note: My picture was already quite bright to begin with and with the light background the hair merges in a bit. There are a few other steps you can take that can make it look a bit better, I will post them next!
You will need to Flatten the image before you can save it. To do this go to Image > Flatten Image |
|
|
|
|
15
|
Simmers' Paradise / Sims 2 Pictures / Harry Potter Sims
|
on: June 13, 2007, 12:43:19 pm
|
|
I've got some Harry Potter characters in my Sim Cinema Challenge entry. I'll wait till after its finished to post them here but your welcome to have a look at the contest thread! xXx
|
|
|
|
|
|