Insimenator.org
March 28, 2024, 12:15:24 pm *
Welcome, Guest. Please login or register.

Login with username, password and session length
News:
 
  Home Forum Help Search Calendar Login Register  
  Show Topics
Pages: [1]
1  Sims 2 Community Downloads / The Trashed Set / The_Balloon_Dog's Industrial Set, 1st Wave objects on: July 14, 2007, 11:23:36 am
It's rather a haphazard effort on my part as far a repair goes, I'm afraid.  I'm doing these more by what I can find in SimPE at a glance than anything else, and perhaps by what strikes my fancy, Cheesy


At any rate, I've got some items fixed for this set, tested with all EP's but all base game objects.  It should be no surprise that you need CEP for this set, right?  So, my album for this wave of object recolors includes 21 images.  Several of these are multi-part packages though so the rar file has more than 21 packages in it.

Industrial BBQ


Chess set


end table


This assortment includes the BBQ and chess set shown above, 2 couches (both recolors of the Candy sofa), a living chair, end table, fridge, 2 bookcases, a 12th century vase recolor, desk, easel, 2 mirrors, a window, telescope, bar, computer, dresser, and a a garbage bin.  

computer


dresser


Album here.

I'll keep at it, I've got lamps, beds, counters, bathroom items, and barstools coming... soon, yeah.  Wink
2  Sims 2 Community Downloads / The Trashed Set / The_Balloon_Dog's Industrial Set, Walls and Floors on: July 13, 2007, 01:04:13 pm
Um... There's more to add to the trashed set, yes.  I've got more stuff for it, but before I upload KThompson's stuff I thought I'd work on adding rusted metal to the mix.

Ribbed metal walls, 10 panels


The_Balloon_Dog was inspired by the Trashed Set to make his Industrial Set.  The set was the only thing that he posted.  It's a great set for someone's first and only bit of work in SimPE and HomeCrafter.  This set, I've been told, has inspired other wall and floor crafters to heights of realistic goodness (and the fella knows, I'm sure, that I'm talking about him, LOL).

Metal Decking Floor


Today I bring you the Industrial Set Walls and Floors.  All credit remains with The_Balloon_Dog.
 
The set includes 10 metal ribbed walls, 5 London Chimney brick walls, and 9 assorted metallic (non shiny) floors.

Additional pictures here.
3  Sims 2 Community Downloads / The Trashed Set / DumbBlonDe's Trashed University Stuff on: July 09, 2007, 05:25:24 pm
This includes both University and base game objects.  You will need university for the following items: lockers, dresser, counter, and minifridge.

Other items should show up in the base game.
4  Sims 2 Community Downloads / The Trashed Set / DumbBlonDe's Trashy Bedroom on: July 09, 2007, 05:06:35 pm
Includes Bedding, lamps, curtains, pictures...  Ah, just look at the pictures!  The sofa bed shown here is from SimsAddict at TSR.  Look at how nice the textures fit!
5  Sims 2 Community Downloads / The Trashed Set / DumbBlonDe's Trashy Fab Living on: July 09, 2007, 04:54:47 pm
Various pieces to mix into trashy households.  Includes sidetables, sofas, chairs, cheap electronics, pictures, and curtains.
6  Sims 2 Community Downloads / The Trashed Set / DumbBlonDe's Trashed Childhood and Infant objects on: July 09, 2007, 04:33:49 pm
This set features base game objects for infants, toddlers and children.  It's not a complete set, and I may add additional pieces to it.  DumbBlonDe made Crib bedding, a changing table, high chair, pottychair, the pegbox toy, a teddybear, the child's cooking stove, and the toybox.

The Crib frame was colored but not released.  I've created the frame using the textures DumbBlonDe provided and I include it here.

The Teddybear has been fixed to not revert to the Maxis texture upon leaving the lot and no longer overrides the original worn texture.  

Images attached below.
7  Sims 2 Community Downloads / The Trashed Set / DumBblonDe's Trashed Bath on: June 18, 2007, 10:16:55 pm
Right... Here's the original bathroom set by DumBblonDe.  It includes the cheap toilet and seat, the cheap sink, shower, tub, and as a bonus the cheap shower/tub combo.  Warning... these look like they haven't been scrubbed in years.

Right... Pictures Wink


shower/tub


sink


toilet and seat

More images here.
8  Sims 2 Community Downloads / The Trashed Set / InSIM thank you gift: "Emma Ray's Gas & Tow" truck (with bonus) on: June 18, 2007, 09:50:19 pm
This is gonna be an exclusive new addition to the Trashed Set that I'm not uploading anyplace else.  The reason why is that the mesh is - tricky - to get a hold of.


Caravan Sims has a number of interesting lots with "hidden" meshes in them.  The only way to get the meshes is to download the lot and either install it or use clean installer to extract the mesh you want.

How to get this mesh?  Go to http://www.caravanshopsims2.net/EN/caravan.php
Downloads / lots / community / STATION SERVICE

That's the lot you want.  I extracted the mesh because it wasn't showing up, but it is included in the Caravan sims lot download.  The mesh is called 'Breakdown truck' in English and 'Lithium depanneuse.package' when extracted.

Ah and according to the FAQ I can't actually include it otherwise I would. So I've given you a way to get the mesh, now I suppose you want the trashed version of this truck.  It's attached below.

I've made another recolor as well, for PegasusDiana that says "Opus & Goober" instead of "Emma Ray's Gas & Tow" I'm attaching it too, without any pictures.  The Truck itself looks the same but the sign's writing is in a yellowish gray color.
9  Sims 2 Community Downloads / The Trashed Set / DumBblonDe's Trashed Kitchen on: June 17, 2007, 11:22:32 pm
Um, I just added the stove...  :tongue2:  The main rar now has the stove.  For the 16 people who downloaded it before I put the stove in I'll leave the individual stove rar up.  Ok?  Ok!

Fixed for EP!

It's the original kitchen items, base game meshes, by DumBblonDe.

Pictures?  Sure thing:


stove


counters


curtains

More images here.

Set includes cheap counter, two tops,  curtain, stove, dishwasher, fridge, microwave, table and chair (and more if I spot it).
10  Sims 2 Community Downloads / The Trashed Set / DumBblonDe's Trashed Walls and Floors on: June 17, 2007, 02:35:43 pm
This post brings you the HomeCrafted Goodness of DumBblonDe's genius. Walls and floors so grungy that you'll swear something is alive on them...

But they say pictures are worth a thousand words...

I'll just give you a few.


Lino


Rotted Clapboard


Stained Walls


Old Brick
There are a total of 10 wall styles, several of which have alternative panels to mix and match, and floors of every category, some with extras, for your grungy sims.

If you want to see more pictures before you download there's a gallery Here .
11  Sims 2 Community Downloads / The Trashed Set / New Home of "The Trashed Set", "The Industrial Set", and Pixelhate's build sets. on: June 17, 2007, 01:59:01 pm
As I have been given control of the original Trashed Set created by DumBblonDe at MTS2 and the original Industrial Set by The_Balloon_Dog and both sets require repair to work with expansion packs, I have decided to move them here.

DumBblonDe's files shall be uploaded here in the following days, including object recolors, walls and floors, and sims.

The_Balloon_Dog's files will be uploaded as I repair them.

Pixelhate's walls and floors previously uploaded to InSIM have been moved here by request, and older items found at MTS2 that are not uploaded here will be added if he allows, as he's asked me to look after his sets for him.

I take no credit for these files and am acting as caretaker only.  Please treat the sets well and enjoy them in your games.
12  Sims 2 Community Downloads / Women / Leeloo's Thermal Bandage outfit, The Fifth Element on: June 08, 2007, 01:13:21 pm
I'm planning on posting this on my website this Sunday but thought that you good folks at Insim should get it first.  I've downloaded the lovely Leeloo sim from here and was - disappointed - with the bandage outfit provided with her.  Not only did it not appear in my game but it didn't match the movie's version very well.  

Instead of huffing and puffing and getting all Zonky about it (meaning blowing stuff up), I decided to do something to correct the obvious oversight.  The result of my labor is this:  


I've watched the scenes in which Leeloo wears this outfit so many times I think I've burned them into my brain.  While the stitching on the sim version is not a zigzag stitch used in the movie, I found that the graphics did not exactly allow for that sort of detail.  My bumpmap uses the original texture file from the other Leeloo bandage outfit created for that sim, but the texture itself was created by a fellow Animal Army member who declared that she wanted no credit Wink .  I liked the texture of the other outfit enough that I wanted to include it as homage in some way.  

The alpha for this outfit was entirely constructed by hand using The Fifth Element as a reference. I've seen this outfit done in both black and orange for Sims1 and anyone wanting to make those versions using my outfit as a base may do so as long as the outfit is kept free.  

I also want to mention that without a couple of good buddies in the Animal Army I would have never gotten this done.  You know who you are... ^_^

If I can ever find a good mesh for it I plan on making Leeloo's plaid robe too...  Oh and before I forget, there's a version of this outfit planned for the 34A/milla bodytype to be released at Warlokk's forum as soon as I get some pics of it.
13  Simmers' Paradise / Tutorials / Tutorials for "Dummies" Series: Genetic eyes on: June 07, 2007, 01:53:52 pm
This tutorial is different than my default one in that you won't need to mess with graphics at all.  Making eyes function in the game like the defaults (i.e. genetic) is done by changing internal values on the genetic line.  Lost?  Don't be.  Just follow along the tutorial.  It's not that hard.

0o0o0o0o0


Making Genetic Eyes: A “Dummies” version.
For Lilwen, by request.


Got eyes?  Sure you do, but I mean for Sims2.  If you are like most people you have tons of eyes, all custom, but none of them play nice with the default textures or replacements.  There’s a very simple reason for that, Bodyshop assigns a genetic value to custom eyes that assumes those eyes should always dominate over the in-game eyes.  But you don’t have to stand for this behavior.  You can change it!  

What you need:
SimPE
Eyes to mod
This tutorial


First off, you’ll need to know a bit about how the genetic structure for Sims 2 works.  For eyes there are currently 5 values the game is known to accept, and possibly there are more. Here are the values in order of dominance:

Custom  = 0
Brown/Dark Blue = 1
Green/Gray/Light Blue = 2
Not used = 3
Not used = 4

Notice that the higher the number the more recessive it is. The game does not blend values, so there are no in between numbers either.

Also notice that the value 2 carries the entire group of ‘recessive’ eye colors in the game.

If you use default replacements you can set your browns to 1, your hazels and greens to 2 and your blues to 3 by simply making all three of the default recessive colors shades of green and hazel and assigning the blues as NPC ready versions.  I’m sure there are ways to change the default swatches too, I just haven’t come across them yet.

Okay, so now you should sort your eyes.  

I’m going to pick one of Rensims’ eyes at random to walk you through this

Here's the view in SimPE


My random eye is dark green.  That qualifies it for a recessive placement of 2 no matter how I set up my default replacements.


notice the 1. 2. 3. here.
1 is the resource tree window. 2 is the resource list window. 3 is the plugin view window.


In the resource tree window select the “Texture Overlay XML (XTOL) (1)” line.
 
In the resource list window there will be a single item.  It will say Texture Overlay XML. Select it too.  In the plugin view below those windows you will see this:


It’s the CPE editor that we want to use.  There are a lot of values here I know.  Most of them you can ignore.  


The important line here that we want to edit is the “genetic (dtSingle) = 0” one.  Notice that ‘0’ there?  That is what tells the game the eye is a custom one and should always override any other non-custom genetic eyes.   Select that line and notice that the boxes, ‘Name:’ ‘Type:’ and ‘Value:’ on the right each have part of that line’s information in them.  What we want to change is the ‘Value:’ box.


Then hit the ‘commit’ box.  


The final step is to save the file.  I always use “save as” to remind myself to rename the file.


Bonus Info:

How about making those eyes you just geneticized into ones that the game will use for NPC’s and townies?

While in the same screen you will want to change two more lines, the “creator (dtString) =”  and the “family (dtString) =” .  Both lines have long letter-number strings behind them and those strings vary for every custom eye package.  


So copy this:
 
00000000-0000-0000-0000-000000000000

Select the creator (dtString) line and in the value box highlight the existing string. To paste the new value in that box use “Ctrl-v” on your keyboard.


Do the same thing for the family (dtString) line. (note in a few cases this has caused problems, if your eye package is not an individual eye texture or if you find that the eyes don't work after changing this value then revert to the original data string.  This is why I tell you to do 'save as' and rename)


Commit.  Save as. (Remember, I do this to change the name of the file.  I want to note this is an NPC ready version).

There.  It's a rinse and repeat operation from here.  

I usually set my pink, red, and off colored eyes to 4 and don't use 0 at all.  You could however use 0 for your black colored eyes and those few custom eyes you really like if you don't mind them being so dominant they take over your neighborhood.
14  Simmers' Paradise / Tutorials / Tutorials for 'Dummies' Series: default eye replacements. on: June 07, 2007, 10:29:02 am
Making eyes into default replacements is not that hard if you are in the know about exactly what to do. I originally made this tutorial for the lovely, wonderful, Pickpock and thought others might like it as well.  It's 11 pages with pictures in Word.  I know a great many folk don't have Word so I'll put the tutorial here.

0o0o0o0o0

Default replacements: the easy way!
For pickpocket @ insim.

What you need:
SimPE
DDXtools from Nvidia.com. http://developer.nvidia.com/object/nv_texture_tools.html
The attached package files

The default replacement files for eyes are all “texture only” packages.  Unlike other eye package files there is nothing but the single texture that you want to override the game’s texture with.

Here the name is vital.  If you mess up the name of the texture then the game will not override its internal textures.

The alien default:
 uuface-eye-alien_txtr

Brown:
uuface-eye-dkbrown_txtr

Dark Blue
uuface-eye-dkblue_txtr

Green
uuface-eye-green_txtr

Light Blue
uuface-eye-ltblue_txtr

Gray
uuface-eye-gray_txtr

Vampire:
emfacevampire-pale_txtr
(note this is part of a full-body layer that works like costume makeup.)

Now that you have the names you need to know what to do with them.
There are two ways to go about this process.  The hard way is to make a copy of an existing eye that you like and remove everything except the texture.  Then rename the texture to the name you want to override.

But first I’ll show you the easy way.
Open SimPE.  (Deep breath, Deep…. It’s okay, you can’t break anything with this process. It’s safe.)

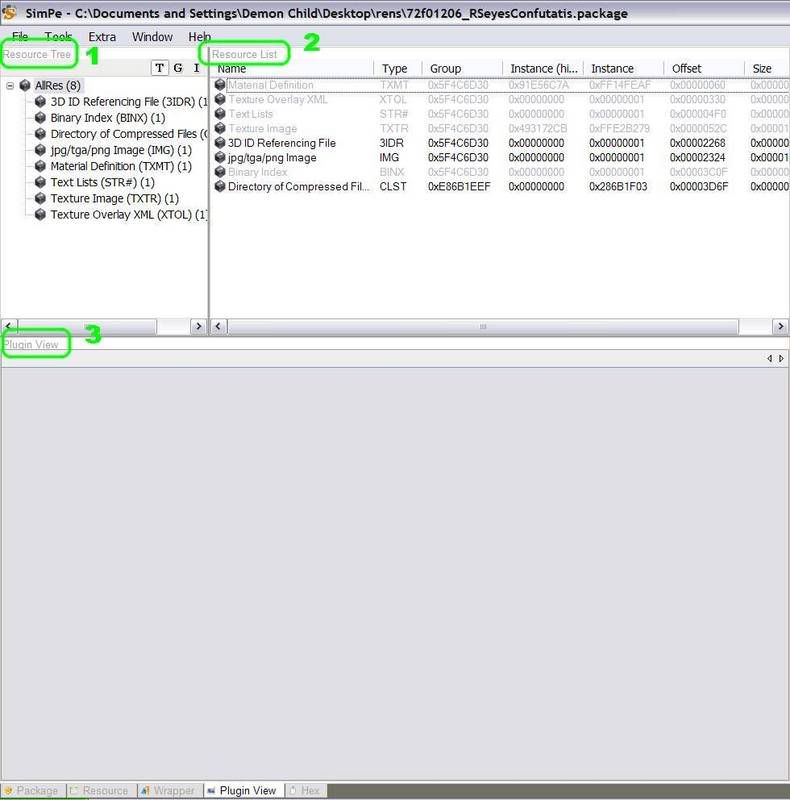
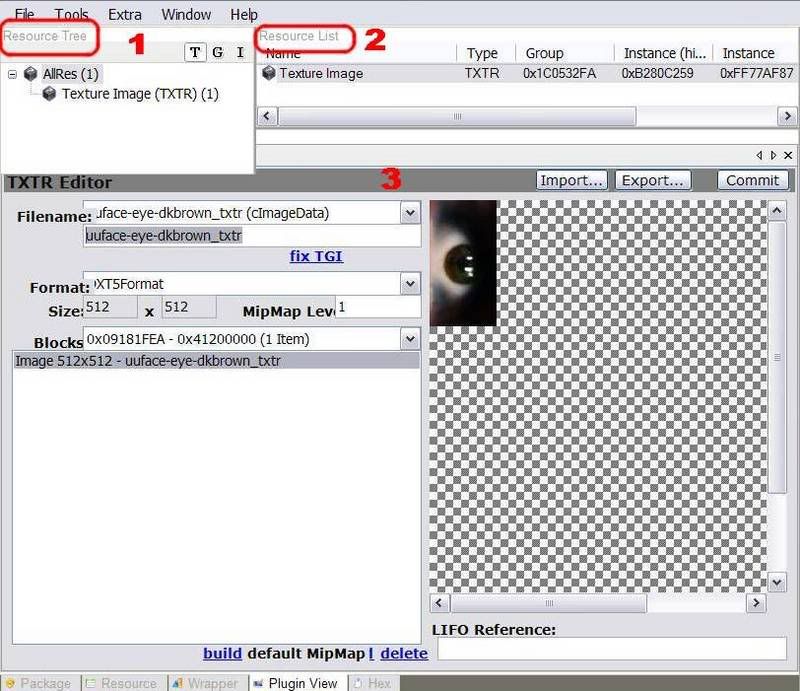
The main boxes of SimPE that you will need to use are:
1. The Resource Tree
2. The Resource List
3. The Plugin View
These should be up by default if not then go up to extras/preferences and choose reset layout.

To open the file you want to use select File/Open or use [ctrl]+O.  Once the file opens you should see this:
 

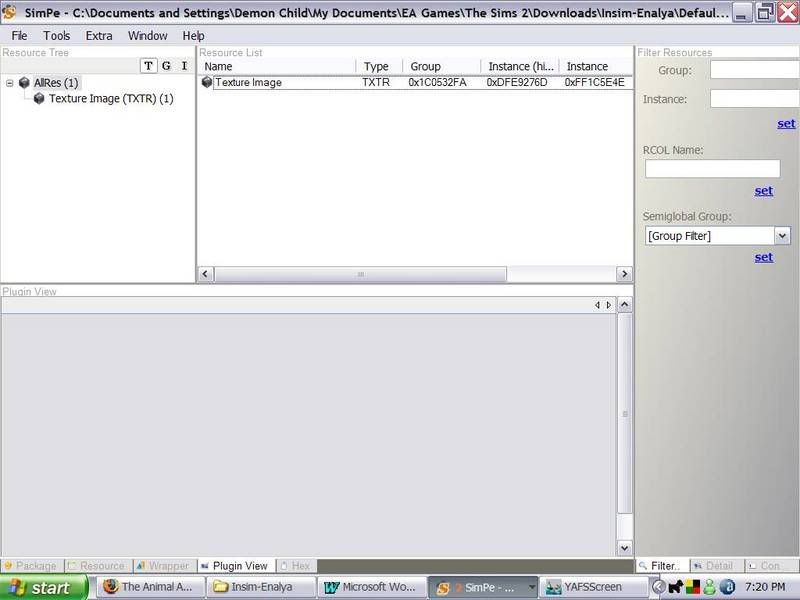
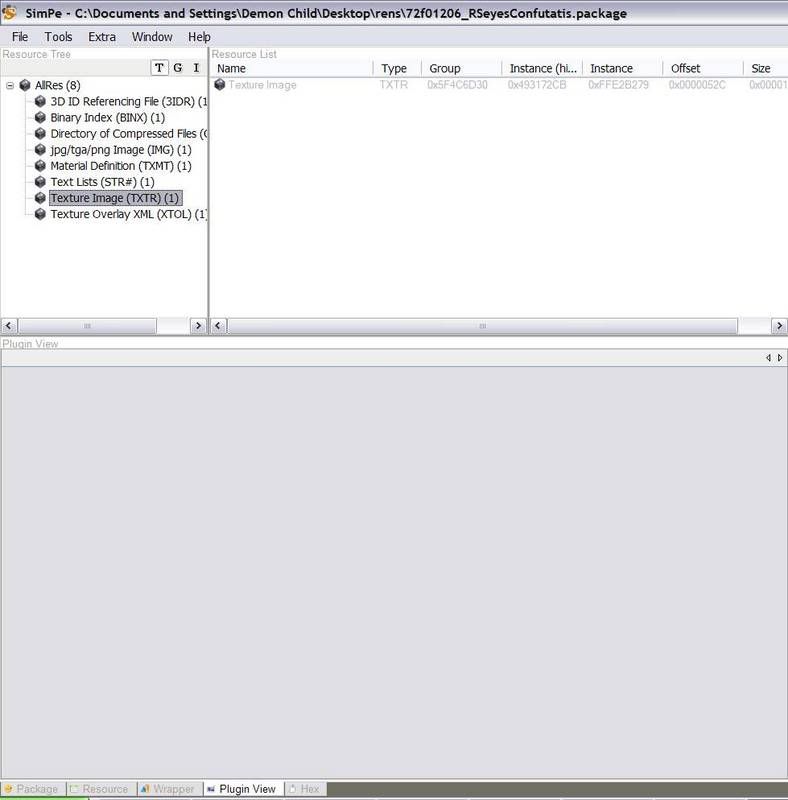
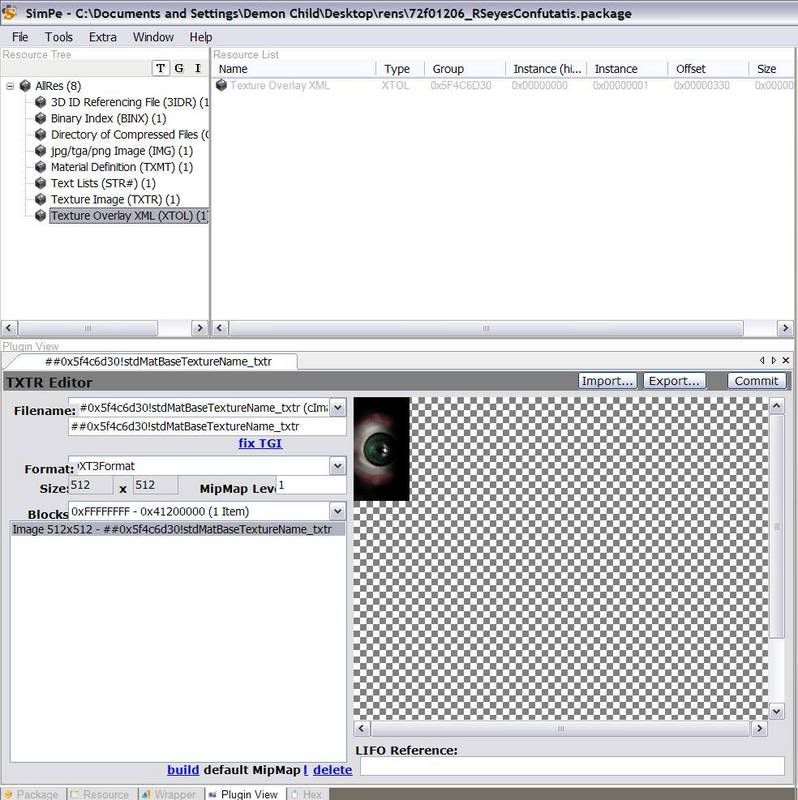
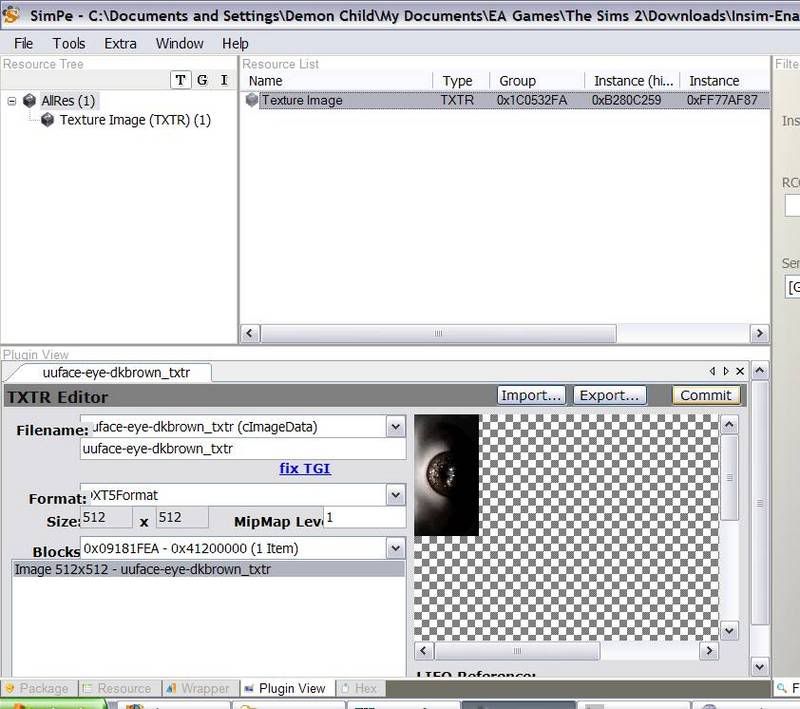
Click on the “Texture Image (TXTR)(1)” to sort the ‘resources’ (the parts that make up the package file). In this case there should only be the single Texture Image to deal with.

Then click on the “Texture Image” at the 2 area and once it loads you should see something like this (the brown eye default):


To do an easy replacement, locate a brow eye you like better and we’ll swap out the textures.
I’m going to use enayla’s new eye, “midnightness”

Since I’m doing a texture swap I need to keep the existing SimPE program open while I open up another ‘instance’ of the same program.  To do this, just go to the existing eye package and click on it.

You’ll end up with this:


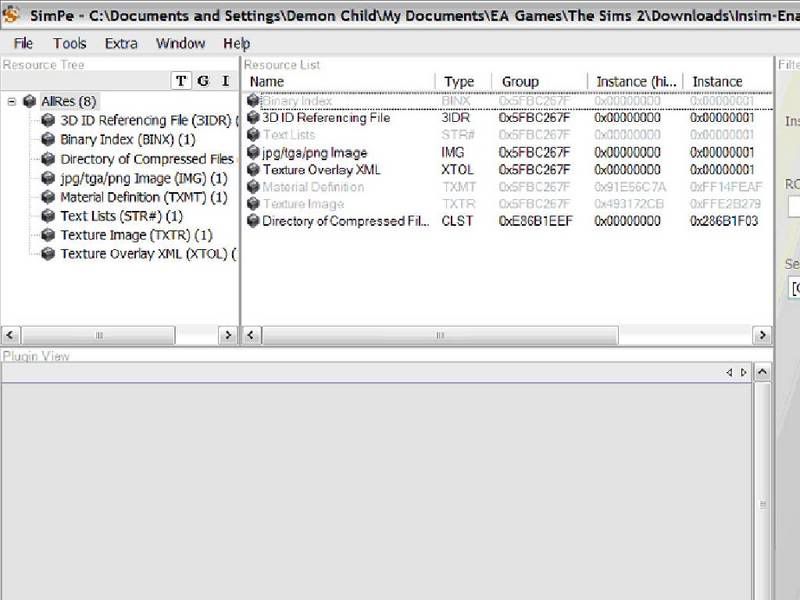
Look at all the ‘resources’!
This is why we need the resource tree.  All we want is the texture.  
Click on “Texture Image (TXTR)(1)” to sort the items in box 2.  


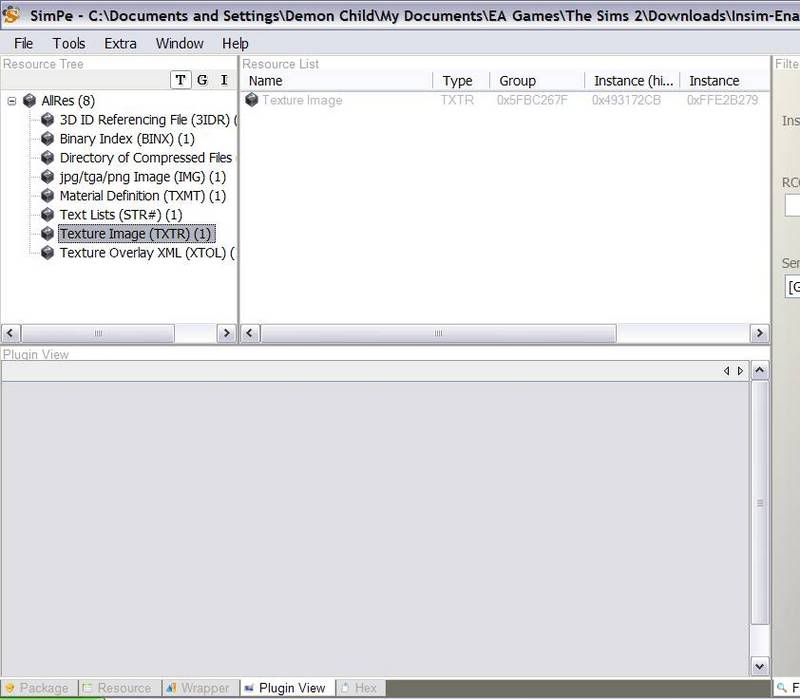
Notice that once you do everything but the “Texture Image” disappears from that box.
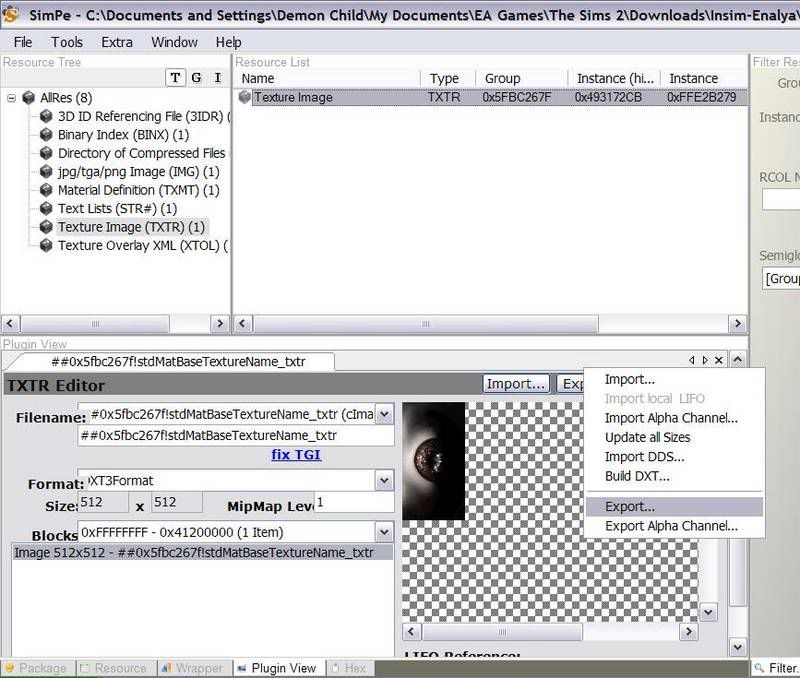
Click on the remaining item and off click on the lower picture that appears.


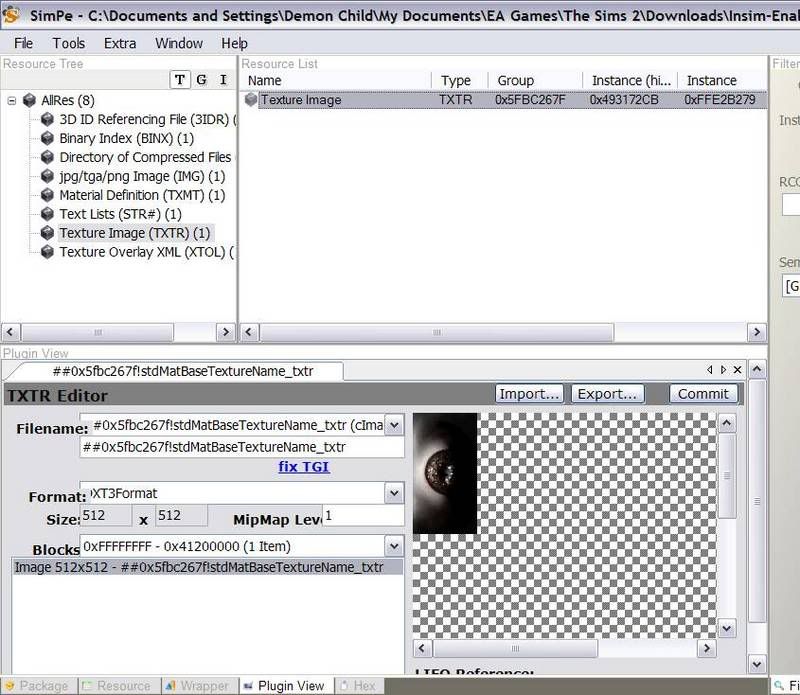
Off click on the image to bring up the menu. Select ‘export’.


Now go back to the original default package.  You have two choices here.  You can “import” or you can “build DTX” (Build DTX only works if you download and install the DDS tools from Nvidia.  Trust me, using build DTX results in a clearer crisper image in the final product than import and so most creators prefer to use it.  Note: Installing the tools on your computer is not enough, you must go into extra/preferences/system folders and point SimPE to the installation location of the tools. Example: on my machine the tools are installed at C:\Program Files\NVIDIA Corporation\DDS Utilities.)


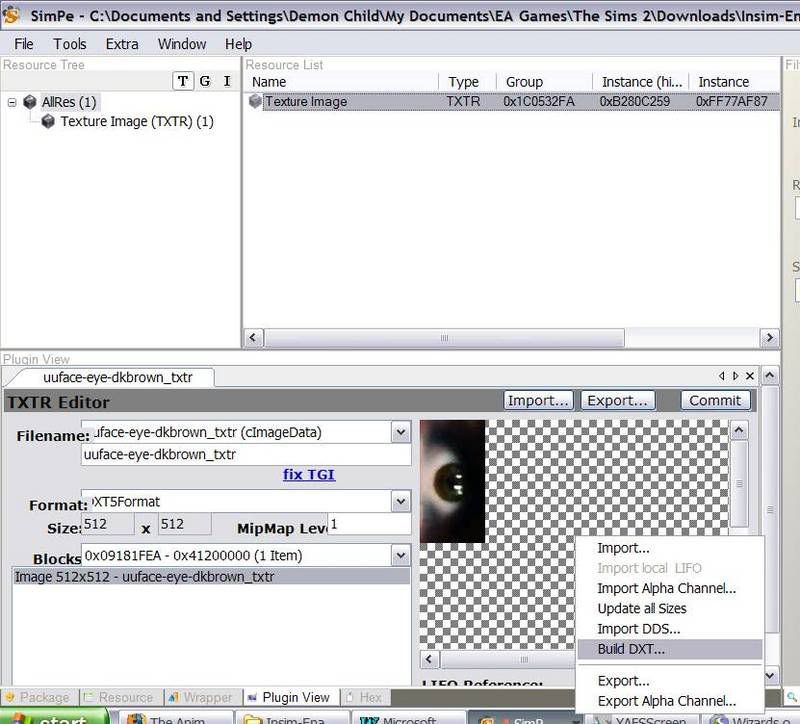
Because I don’t want to ruin Enayla’s quality work I’m using Build DXT.


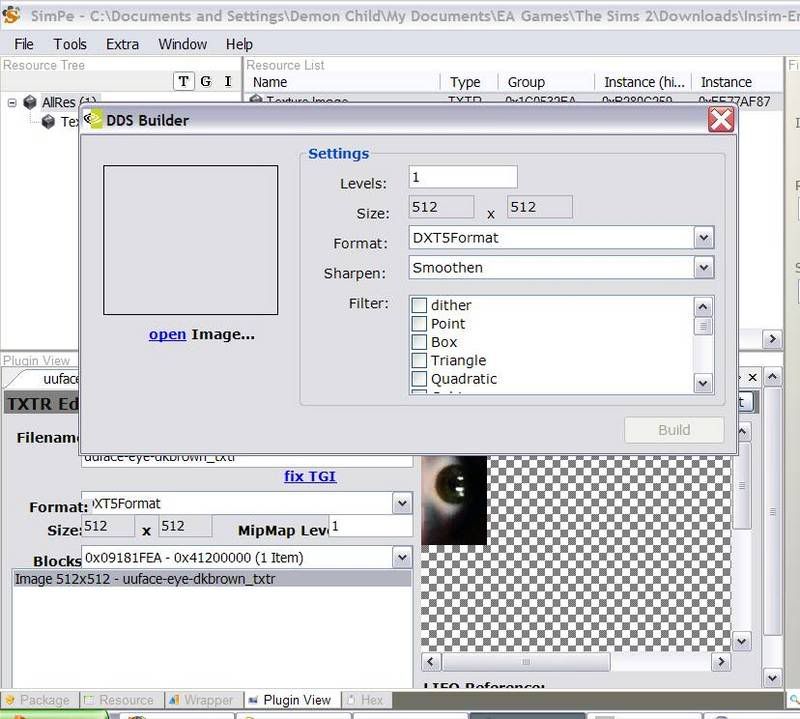
At this point I only want to “open” the image.


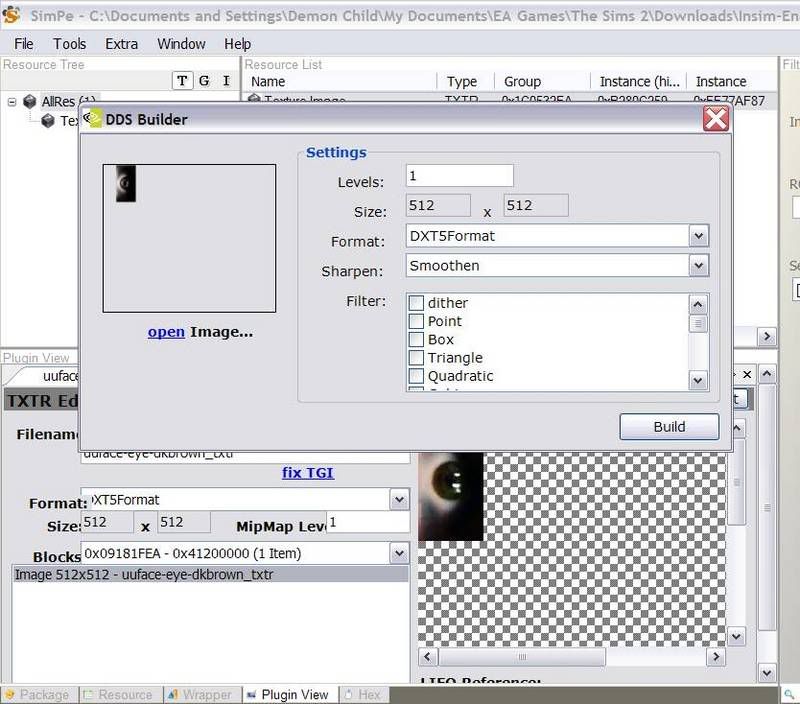
Once the preview shows up of the texture you want then hit “Build”  The screen will pop up with a black box that looks a lot like a DOS prompt while the DDS utilities do their work.


The final result.  But we’re not done yet.
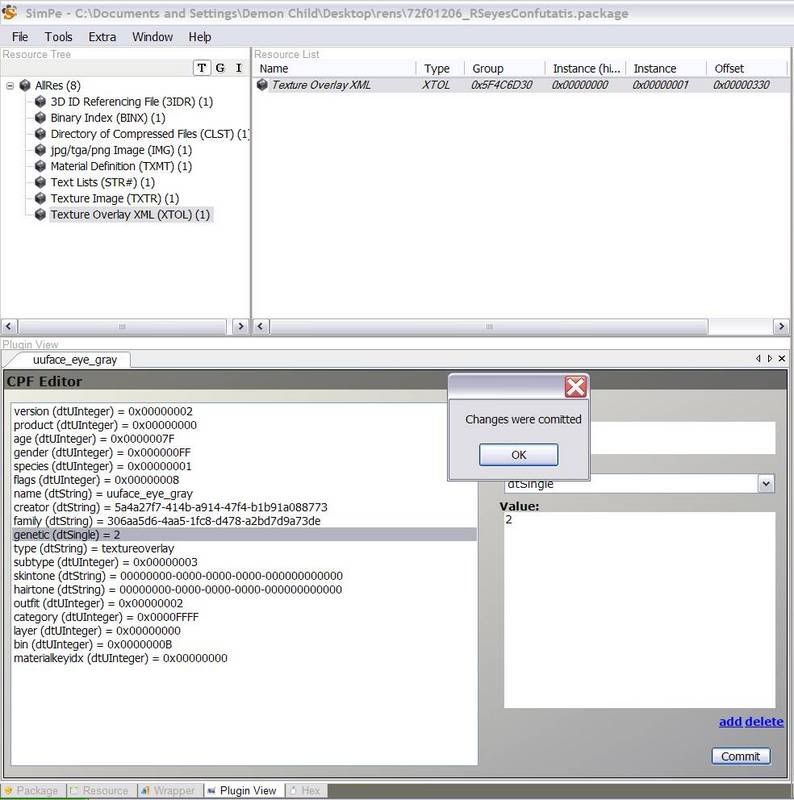
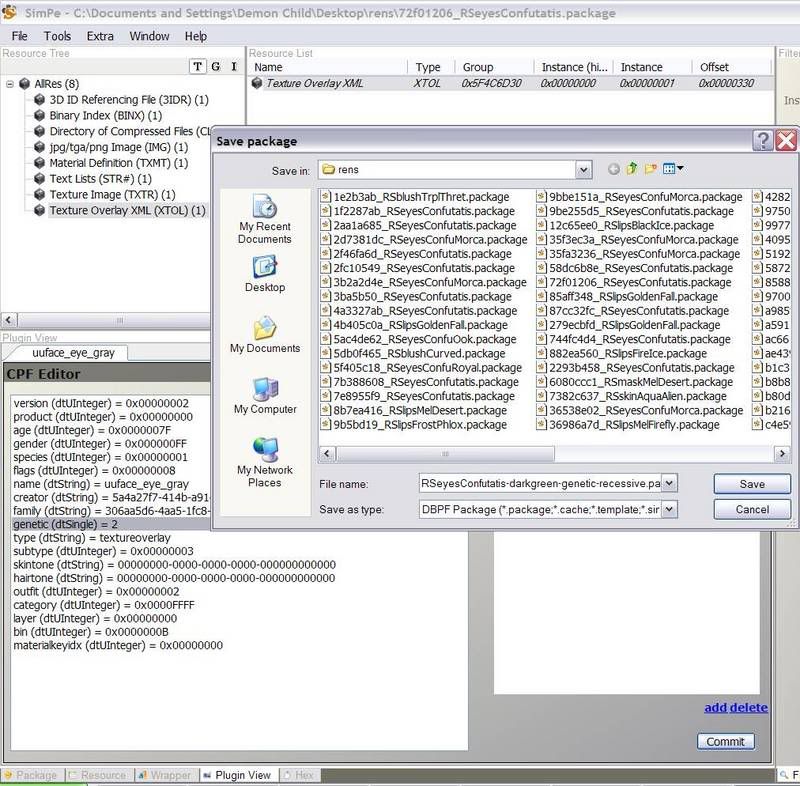
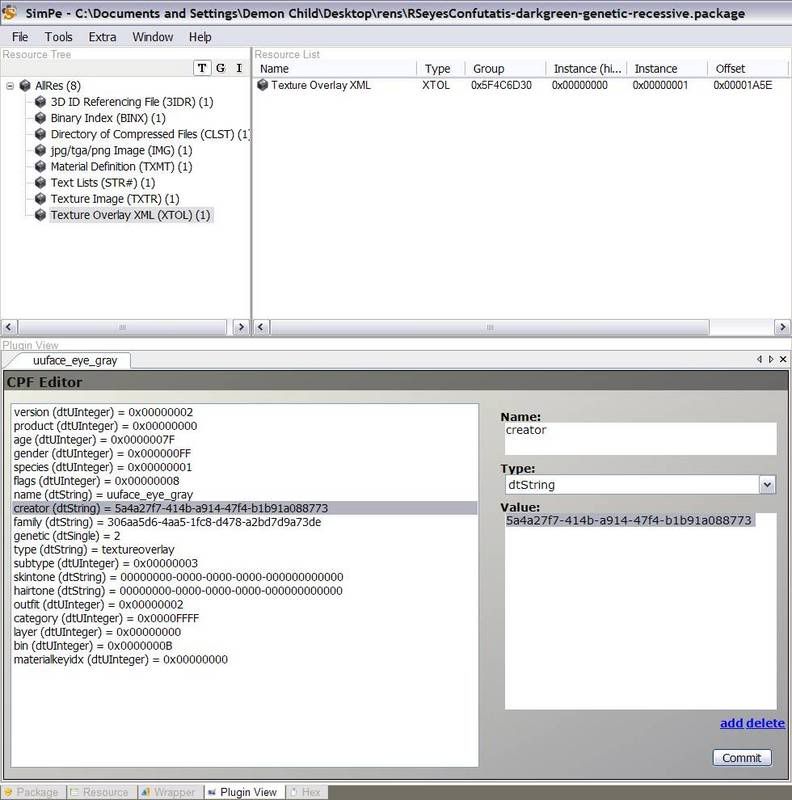
You need to “Commit” the changes or else SimPE won’t save them.


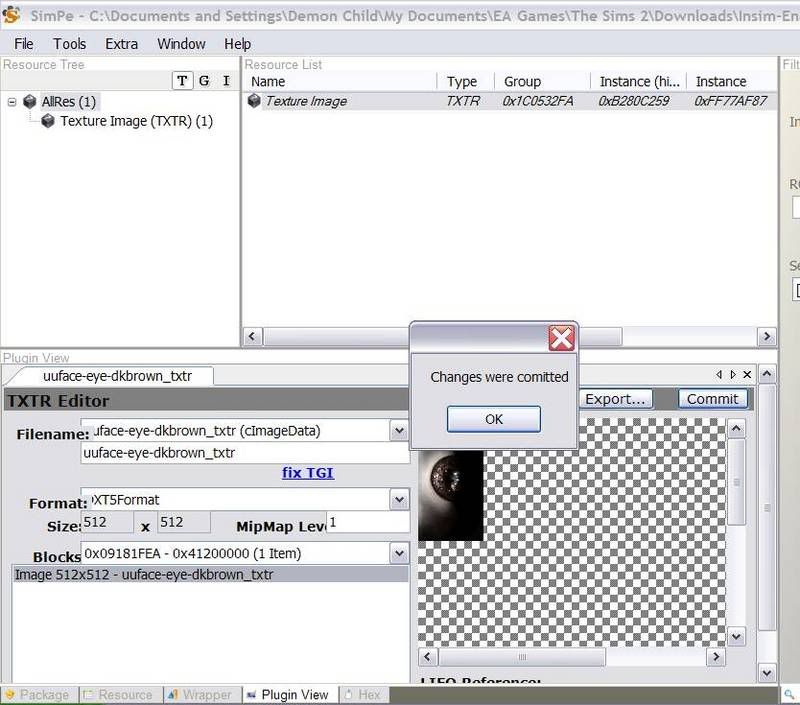
Hitting the “Commit” button calls up the little box there that informs you that indeed the changes have been accepted by the program.  Almost done.


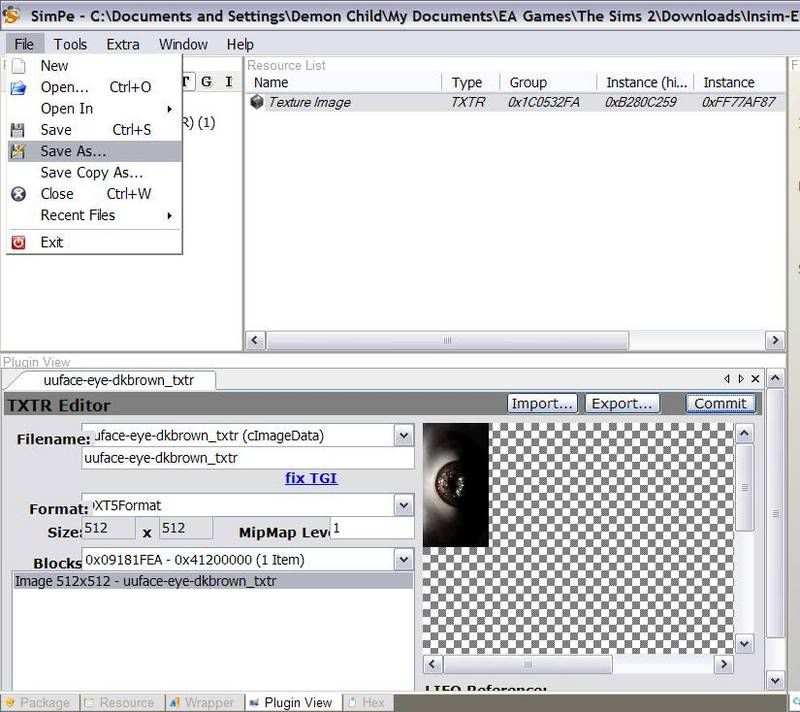
I usually do “Save As” at this point because it forces a rename of the file. This one went from “default-enaylaSoftBlack-browneye” to “default-enaylaMidnightness-browneye”.

All the basic eyes work the same. The only one that is different is the Vampire one.

Here I’m going to replace the eyes in my current vampire default skin (by Patches2sim) with one from Enayla.  

Start with extracting the old texture with the eye you want to replace:
 

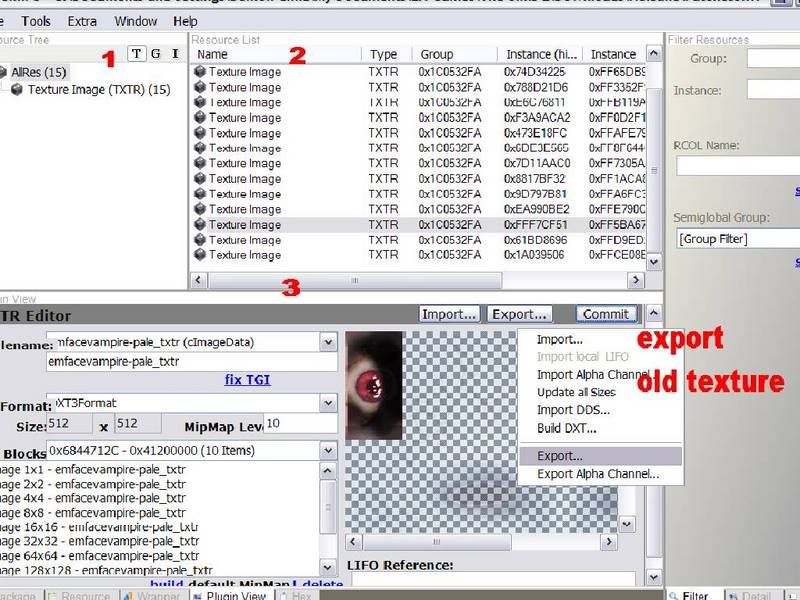
It doesn’t really matter what graphic program you are using. You may need to export both the texture and the alpha channel.

(If you want to replace the entire skin then you will want to extract all the alpha channels for all 15 textures.)

Now, you will need your eye texture.  If you have a new or saved .bmp file that you have made yourself  then you will only need the alpha channel we’ve extracted.  Otherwise you need to open the eye package that has the texture you want in SimPE, just like before.

What I did was to open up my replacement texture and select the eye, copy it. Then I opened up the other texture for the face, pasted the new eye texture over the old one and saved it. Back in simPE I used Build DTX, then committed and saved.

You can do the same thing with your .bmp.  Open it first in your graphics program, select the eye texture and copy it.  Then open the exported file and paste your eye in place. Save it as a .png.  The use “build DTX” to insert it into the package just like before.

Doing the entire skin would mean adding another step, “Import Alpha channel” to each of the 15 textures.  But that’s another tutorial…

0o0o0o0o0
attached here are my default replacement packages that use enayla's eye textures.  You may use these as a base for your own default replacement eye packages.  If you use the vampire one please credit Patches2sim for the replacement alphas used in the body and face texture.
Pages: [1]

Powered by MySQL Powered by PHP Powered by SMF 1.1.21 | SMF © 2015, Simple Machines Valid XHTML 1.0! Valid CSS!
Page created in 0.147 seconds with 29 queries.
SimplePortal 2.1.1