IMPORTANT EDIT: New pictures are finally in place, and also better texture templates and clearer alpha map included below in the attachments field. Note that the steps each pic corresponds with is BELOW it. All pictures are thumbnails, so you will have to enlarge them to see details. Let me know if there's anything else that I can do to improve this tutorial in any way! :angel:~~~~~~~~~~~~~~~~~~~~~~~~~~~~~~~~~~~~~~~~~~~~
Tutorial: Making Infant Diaper Override Recolors
Introduction:The one area where I felt that Maxis and EA failed us utterly was not giving us the option to do much with infants, other than having them eat, sleep, poop, being played with and talked to, and cry like screamin’ meemies… not that it’s not realistic, but there’s still a lot missing. They don’t have hair until they turn into toddlers, you can’t sit down and hold them, sims leave them on the floor when they’re tired of holding the poor little things, and my main pet peeve is that you can’t change their clothes like every other age group! So many can understand now my overwhelming joy when I first found out about files that could replace the original diaper!
After trying out a few of the diaper replacements, I could say I was satisfied to a point, but I still wanted to see more variety. In fact, I was ready to try out my hand at re-coloring some of the meshes. The only thing was, I never found a tutorial that was publicly available on how to make diaper override re-colors, so I thought I’d never figure out how to do it… that is, until I did some fiddling around with SimPE. It’s almost the same as making default replacement genetics, if you’ve done those before.
I’ve decided to write-up my own tutorial of how to make and re-color your own infant override texture. It’s not a complete walk in the park if you don’t know how to use SimPE, but pretty soon the new pictures I'll take for this tutorial in the very near future should be of some assistance.
Tools Needed:You will need the following…
•
SimPE• The Nvidia DDS tools (Found at
this link... this is essential for enabling the "Build DXT" function when importing the texture.)
• A graphics editing program, like
GIMP, Photoshop, or anything else closely related
• My infant override example posted
here on InSim (or any other override of your choosing... so long as you ask for permission if required.)
• (optional) The two “.png” files attached at the bottom of this post as a base image/alpha map to work on (And once again, you can also choose to export the textures/alpha maps you need from other diaper overides, unless you'd rather use mine. If you do... well... please excuse the quality of the textures. Yes, they look quite fugly, but it's for experimental purposes at the moment... feel free to make them look 499% better than they are at the moment if you'd like. :oops:)
Instructions:(If you plan on making multiple infant override re-color files remember this: You can copy the file and edit the copies however you like with different styles…
BUT you can only have one package enabled at a time.)
The two files that I have included are the actual texture and alpha map for the baby clothing. Open these two images in your image editing program and alter them to your liking. Remember to save them after you make any changes (I’d suggest you save them to an easy to remember place, like to your Desktop), then follow these steps…
1. Open the infant override file (i.e.
“(~TA12~)-Diaper_Override.package” if you're using my example override) with SimPE, and make sure that “Plugin View” is selected at the bottom.
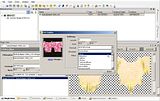
2. After it loads, click on the texture image file name in the
“Resource List” box. Here you will find the skin of the mesh that you will need.
::smilieiforgetwhi::
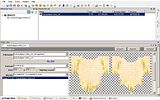
::smilieiforgetwhi::
(click to enlarge)(
To clarify the following steps: This is just in case you do not have any "base" textures to go off of, or just in case you're using a different diaper override as a base other than my pale onesie linked above. I would suggest using the attached images if you are using that file I made, as the textures are quite blurry upon exportation. If you already have textures prepared at this point to import back into the package file or using the images I provided below, skip to step 8. Otherwise, if you're using a different override as a base and want to recolor the textures for it, start here at step 3.)
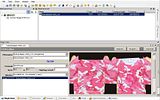
. When the image in the “TXTR Editor” box comes up, right click it, and a menu will come up.
::smilieiforgetwhi::
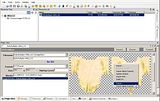
::smilieiforgetwhi::
(click to enlarge). Select
Export…5. When the Save box pops up, choose the location of where you want to save the changes to the texture, and click OK.
::smilieiforgetwhi::
::smilieiforgetwhi::
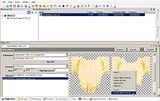
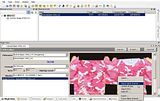
(click to enlarge). Repeat steps 3-5, only this time for #4, choose the
Export Alpha Channel… option.
7. Once you have both your original texture and alpha map exported, you can edit them however you like using your image editing program. Once you've made all the changes, save your work and return to SimPE.
8. Going back to the “TXTR Editor” box, right-click the texture image, and choose the
Build DXT option. (...this option actually preserves the quality of the textures, unlike the "Import" option which can lower it.)
::smilieiforgetwhi::
::smilieiforgetwhi::
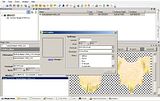
(click to enlarge). When a small box with the title of
DDS Builder pops up, click on
open underneath the small "preview" box to the left, and find the name of your main texture image that you just edited. Click OK, and a small thumbnail of the image will appear in the box.
::smilieiforgetwhi::
::smilieiforgetwhi::
(click to enlarge). Click on the second scroll-down menu entitled
Sharpen (located to the right of the DDS Builder window), and scroll upward until you find "
None". Select this, and choose
Build.
::smilieiforgetwhi::
::smilieiforgetwhi::
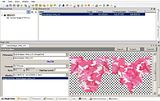
(click to enlarge). After a little DOS window pops up momentarily and disappears, the image in the “TXTR Editor” should now be changed to your edited image.
(
At this point, if there were no changes to the alpha map of the outfit whatsoever, you can commit the changes and save. Otherwise, if there are changes to it (or you find that the infant outfit's whole texture map is covering the entire area of the TXTR Editor like the picture above), continue on the following steps.)
::smilieiforgetwhi::
::smilieiforgetwhi::
(click to enlarge). Right click the image again, then select
Import Alpha Channel…13. Locate the name of the alpha channel, and press OK. The image in the box, if it hasn't before now, should now take the shape of the alpha map that was just imported. Hit the Commit button.
14. Now for the slightly confusing part. Because the alpha map was imported, this will result in the textures becoming blurry and pixelated if you save your changes now and exit. In order to avoid this, re-export the image currently in the "TXTR Editor" box, and use the Build DXT function to re-import the exact same image. The end result should be slightly similar to the below picture. Afterwards, you can commit your changes, save, and exit without a second worry of image problems.
::smilieiforgetwhi::
::smilieiforgetwhi::
(click to enlarge). Now for the easy part: Testing! Load your game and either find a family with a baby, or spawn the Tombstone of Life or Death to create a new baby. (type
boolprop testingcheatsenabled true in the cheat box, then shift + click a sim for the spawn option) Your babies should now be wearing the new outfit you’ve made.
The best part about
this override is that it will come off when changing diapers or bathing the baby, along with the ability to fit with any diaper mesh override to your choosing. If you are recoloring another diaper mesh, (i.e. one of BlooM's multiple override meshes in his section) the mesh is already included... so there's no need for enabling other recolors/override meshes to get yours to work, as you can only have
one diaper override package working in your game at a time.
I hope that this tutorial will help make a difference in the variety of removable infant clothing. If you have any questions, feel free to post questions here in this thread. I'll be happy to help you out in any way I can.

Enjoy! :angel:

